Tuesday, November 15, 2016

Save a file in 2 different folders in Google Drive

For Capstone research I have Google folders with material for over 70 topics which I happily share with students if they need some help.

Not surprisingly, there's a great deal of overlap, and some articles are appropriate for several different topics.

If you'd like to share the files among several folders without having to make multiple copies, here's how to do it.

Navigate to the file you wish to share in Google Drive; highlight it and click Shift + Z


Click on the arrow at the end of My Drive.

Navigate to the folder in which you also wish to save the file.


Click Add.

Done!

Monday, November 7, 2016

How to put Make a Footer in Word, and How to Make it only appear on One Page

How to put Make a Footer in Word, and How to Make it only appear on One Page

Frequently when I make quizzes or worksheets I print them as two-sided documents because I’m trying to cut down on our paper consumption.

However, some of my students require visual reminders that there is more work on the second side.  So I put OVER→ down at the bottom of the page, in the Footer.  (A Footer is defined as “One or more lines of text that appear at the bottom of every page of a document. Once you specify what text should appear in the footer, the application automatically inserts it.” Dynamic footers include automatic page numbering,  or the current date which changes each time you print the document; static footers include the name of the school or teacher, etc.)

If you know how to make a footer in Word, you can skip down to How to make a footer appear on one page only.

To make a footer,
Click on Insert in the Ribbon
01
And then click over on Footer
02
And type in your footer.

A quicker way is just to double-click on the area at the bottom of your document, which will bring up the Footer menu. (The same is true for the top of the page and the Header menu.)

In my case I made the footer right-justified, typed OVER, and on the Insert menu, went over to "Insert Symbol." I found the arrow symbol and clicked Insert.

How to make a footer appear on one page only 

My problem was, now I have OVER→ on the bottom of both sides of the paper, making it into one of those “How to keep a moron busy (See other side)” jokes.
The solution?

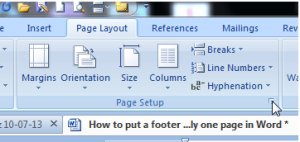
Click on Page layout on the Ribbon

03
And then the little arrow in the bottom right corner of Page Setup

04
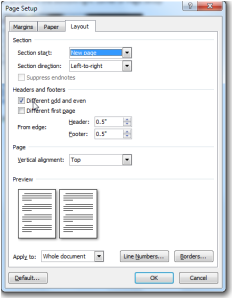
Which will bring up this dialogue box

05
Click Different Odd and Even and the OVER→ will vanish from Page 2!
To make a packet with a cover start with Page 1 on the second page:
  • On the Insert tab, in the Headers & Footers group, click Page Number, and then click Format Page Numbers.
  • In the Start at box, type 0 (zero).

Wednesday, November 2, 2016

A 1x1 Table can clean up your Google Docs

One of the downsides of using Google docs for quizzes is that when the students start typing answers it can mess up formatting for the later questions.

Here's a neat trick for keeping things neat.

After each question, insert a 1x1 table.

Go to Table > Insert table > and choose just one block.


This will place a box under your question.


The nice thing is that no matter how much they type, the box expands and keeps everything together and from encroaching  on the next question.


Color code your Google Drive files

Google Drive makes all folders a uniform, drab gray.


Boring, eh? Not to mention difficult to distinguish.

Did you know you could color-code your folders?

Just right-click and choose "Change color."


Et, voila!


Isn't that easier on the eyes?

Hebrew Fonts in Google Docs

As you may have noticed, there aren't a lot of choices for Hebrew fonts in Google Docs. Right now, Rashi script is one of the only features keeping me attached to Microsoft Word.

Here's how to find the available Hebrew fonts in Google Docs.

Click on File > Language

Scroll past the Latin-alphabet languages until you find עברית. (This does not change the language of the toolbar or the left-to-right orientation of the page.)


When you select עברית, the following fonts will appear in the font section on the toolbar up top. The highlighted fonts work in Hebrew.


When the language selection is English, the only fonts available that will look different in Hebrew are Arial, Courier New (if you miss your old typewriter) and Times New Roman. All other fonts will leave Hebrew in Times New Roman.

There is one other choice (if you find more, please let me know!) - if you go to the bottom of the font list (when the language selection is English) and click "More fonts" - you can search for and choose Tahoma, which is a different type of sans serif font, and might be fun to use on occasion.

Thursday, September 22, 2016

Kehati Mishnayot (Hebrew) are available FREE for Apple and Android devices!

The free Kehati app, which has been done beautifully, is now available for Apple devices as well as Android. Did I mention it's FREE?


The app can be obtained for iPad and iPhones here.

Android devices can get the app here.

Wednesday, September 21, 2016

Google Docs does Columns! Finally!

It finally happened - Google Docs can now format columns.

Just highlight the text you want to format, click on Format > Columns and choose 2 or 3 columns.


And as you can see, it perfectly formats the text into columns.


AND - it handles Right-to-Left text beautifully as well, as you can see from the opening of the מסילת ישרים.


If we could just get Rashi font, I might be persuaded to give up Microsoft Word entirely. :-)

Training for Google Apps

Don't walk, RUN! Run to the Chrome store and install the extension for Training for Google Apps.

Have you ever been stymied, wondering how to do something in Gmail, or Google Classroom, or Docs, or Slides, or Sheets or Forms, to name a few? Did you know you can have a built-in tutorial that doesn't even require you to leave the browser window in which you are working?

Whenever you go into various Google Apps for Education, you will see this little symbol in the right-hand corner:


Click on it and a searchable menu will pop up.


There are lots of items to choose from, or you can search for help on a specific topic. When you choose an item, either a video window will overlay on the screen with a tutorial, or you will get actual prompts (like CLICK HERE) that walk you through the steps.


I've already learned how to do several things that I never thought possible in Google Docs! Give it a try today!

Tuesday, August 30, 2016

Setting Hebrew on a Chromebook

Setting up a Chromebook to type in Hebrew is fairly simple.

Click down in the bottom right area of the screen, where the time and wi-fi signal is.


Click on Settings; scroll down and click on Advanced to see more. Scroll down to Languages and click Language and input settings


Click on Add at the bottom of the Languages window


Scroll down until you find Hebrew; choose it.


Click OK.


With Hebrew selected in the Languages box, check off Use this language for spell checking. (If you choose Display Google Chrome OS in this language, then everything - menus, settings, etc. will be in Hebrew. You probably want to avoid that unless you're an Israeli and you'll be using the Chromebook in Israel. So for most of you - don't.) Under Input, select Hebrew keyboard. Then hit Done.


The first time you switch from English to Hebrew, hit Ctrl+Shift+Spacebar; then you can toggle back and forth using Ctrl+Spacebar

Monday, August 29, 2016

Binary files and How to Avoid Them in Google Classroom

Hit my first snag before my first classes started. I uploaded a Google doc to Google Classroom and it appeared with the words "Binary File" instead of Google Doc.


The result was that although I could open it, my students could not.

Turns out, it was my fault.

When you upload a Google Doc, you can choose the paperclip (upload from your computer) or the Google Drive symbol (upload from Google Drive).


If you have Google Drive installed on your computer, either one should be able to work, but that's where I messed up.

You have to upload Google Docs from Google Drive; do not use the paperclip!

The binary file is actually a link to to the URL of the Google Doc. Since both reside on your computer, it will work for you. But it won't work for your students.

Friday, August 26, 2016

Inviting a Co-Teacher to Google Classroom

Sometimes you may wish to share your Google Classroom with another teacher. Perhaps you are teaching two sections of the same class and want to know what the other is doing. Perhaps you have a Sulam shadow or ESS caseworker who wants to stay on top of a student's workload.

Here's how to do it.

Open the class and go to the ABOUT tab.


Under your name (and picture, if you've linked one with your school account) it says INVITE TEACHERS.

That's it.

Thursday, August 25, 2016

Finding & Installing Hebrew Fonts on a PC

New classroom this year, which means I need to install, once again, some useful fonts on my computer (especially Rashi).

Downloading

The best place for free Hebrew fonts (and more than you can ever want or use) is The Open Siddur Project.

Download the fonts-master.zip file (I have a Fonts folder in my Download folder) and right-click it and choose Unzip. The Rashi font is called Mekorot Rashi.

For a look at all the fonts, open this .pdf

Installing

Once the fonts are unzipped, just right-click the font you want to install and choose INSTALL.

Or you can drag the fonts from their folders in Windows Explorer into the Fonts folder and Windows will install the fonts..
(Open up the fonts folder from the Control Panel or Search for Fonts in the search box when you click on the start menu [the little Windows symbol in the bottom left of your screen])

If you can't find the font you saw on the comparison chart (link above) just search the folder in which you opened the file.

Wednesday, August 24, 2016

Lesson Planner Part Two: Display

In my previous post, I described creating a Google Form to use as on online lesson planner.
Now I will describe what I am doing with the data.

A Confession

All I really want to do with my data is display it pretty much the same way it looked in my old paper lesson planner. Boring and unimaginative. I know. (I'll get a little more exciting with it in a bit.)

The experimental Google app Fusion Tables really fit the bill. (NB - I am having limited success  getting it to work on my Chromebook, just my desktop / laptop. Opening it from this page seems to work, however. )

.

Click "Choose File" and find the Google spreadsheet that you made from your Google form. Allow it access to your Google Drive if it asks nicely.

Follow the prompts, clicking "Next" until you reach the end product.

Choosing "Cards" will give you all your classes in individual blocks.


Click the pull-down menu under Filter if you just want to see one of your classes.


You can copy the blocks if you wish. They will paste into Word (or Google Docs, of course) as a table, and you can format it as you wish.

The final post in the series will cover some other ways of organizing and displaying your data from a Google spread sheet.

Archive Last Year's Google Classroom Classes

Miriam reminded me of this piece of housekeeping.

Clear out last year's classes from Google Classroom.

Go to your main page, click on the old classes at the three dots in the upper right-hand corner.

Choose archive. The class and all its postings will be retained in your Google Drive in the folder "Classroom," but won't clutter your main page.


ADDENDUM: If, like me, you teach the same sections each year, naming the class in Google Classroom can get confusing - in your Google Drive Classroom folder, you'll have several folders labeled "9th Grade Biology" or whatever.

You can go into your Google Drive Classroom folder and rename the old classes to avoid confusion. (Right-click > Rename) I just place an "X" at the beginning of the inactive folders.

ADDENDUM 2: Sometimes I just don't think. 
Go into your classroom folder, make a new folder (NEW > Folder) and name it with last year's date (e.g. "2015-16").
Move all of last year's folders into this folder. SO much neater. 

Tuesday, August 23, 2016

Doc Hub - One Minor Plus over Kami


Although I enthused recently over Kami, the Chrome app Doc Hub has some features to recommend it. The free version is fine for having students fill in pdfs.
You still need to direct it to save in Google Drive; it will not do so automatically. It also saves its own copy of the edited document, so if a student forgets to save it to Google Drive, it is not irretrievably lost.
The one feature it has that I really like is a silly one, but it makes my life easier.
You can insert all sorts of symbols on the document, like check marks and exes.

You can change the size of the symbol and its fill color.


True, you could use the Draw feature on Kami (and as I use a pen stylus instead of a mouse, I can actually drawing something that looks pretty decent - wouldn't want to try that with a mouse). But I like being able to insert those symbols directly on to the students' filled out pdf "papers."

Individual copies in Google Docs

A teacher came to me with a very specific need. He wanted to send out a note-taking template - that he used to xerox and hand out - as a Google doc.

He did not want to have to collect them, so he did not want to use the Assignment feature of Google Classroom with "EACH STUDENT WILL GET A COPY." But he also wanted the option of being able to look at them on line to see how their note-taking skills were progressing.

He did not want to convert it to a pdf and have the students write on it with Kami, because he wanted them to have as much space as they needed to write.

He was also concerned about document spacing - when the students would type in the allotted space on the document, it would push all the white space he had previously created for the students' handwriting.

Spacing


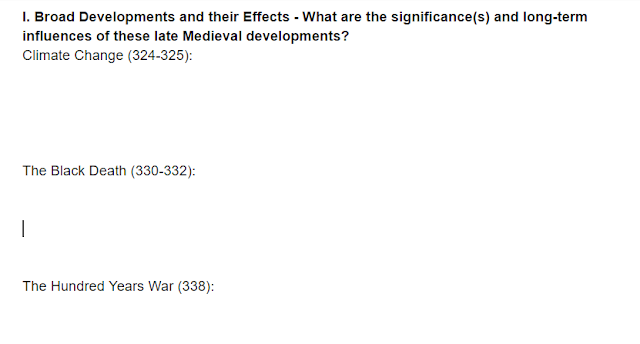
The last problem just required some creative editing. I suggested that rather than leave all the white space, he should just add "RESPONSE - " (or the appropriate prompt) after the question and leave one blank line after that. The students can place their cursor after the word "RESPONSE - " (or whatever) and they can type as much as they like for each question.

So from this...


to this.


Sharing


Deciding how to share the document with all his students, allowing each student to get his/her own copy (no collaborative note-taking!) took some more experimentation. If he just shares the document with the entire class, everyone will be writing on the same document.
The best way to meet all of his expectations is:

Share the Google doc with the class as a Can View.


The students will not be able to write anything on it.

Then the students should be instructed to make a copy of the document. (File > Make a Copy) . The new file will be called Copy of [Whatever the file was named].

Instruct the students to replace "Copy of" with their name, and to share it with the teacher.

This satisfies all the requirements - each student gets his/her own copy, and the teacher can view them when needed and offer feedback or encouragement.

Sunday, August 7, 2016

Lesson Planner Lost & Found

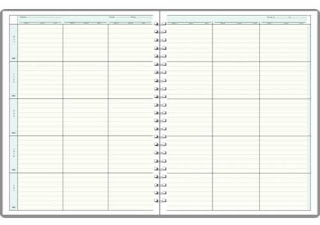
Although I have moved much of my life online (attendance and grades, file storage, bill paying, shopping) I have yet to find an online app or program that could replace the same type of wire-bound lesson planner that I've been using for 28 years.
I wasn't sure what I was looking for, exactly, but I felt, as Justice Potter Stewart said in an entirely different context, that "I [would] know it when I see it."

I finally found a fully customizable program that gave me exactly what I wanted (more on that in a bit), only to be disappointed to receive an e-mail that it was eliminating the free version, and the features that I wanted would now cost me $14.95/month. No thank you. I could get HBO for that.

But having had the program, albeit briefly, it finally clarified for me the criteria I needed to design one on my own. I wanted something that would differentiate between my classes, add a date stamp, give me room to describe what I taught, what got sent out to my students and whether I posted any handouts or SMARTBoard notes to Google Classroom.

The first part of my solution has been Google Forms. (I know, right? It was there all along along, like the Purloined Letter, or the ability to go back to Kansas.)

If you're unfamiliar with Google Forms, I'll provide a brief tutorial. If you are familiar with it, check out the next post, which will detail  the ways I am organizing and displaying all this data once I collect it.

Setting up the Google Form

What follows is what I did to meet my needs. You can set it up however you wish to meet your own needs.

Go to Google Forms (or just Google it) and choose a new document. Click on the first "Untitled Question," rename it Date. In the pull-down menu on the right, choose Date.


Click the + on the side to add another variable, and rename it. This spot is going to be for my classes, so I will name it "Class" and I am going to use a Dropdown menu and add each of my classes.


For the description of my lesson (again, click the + and rename the question), I might need lots of room, so I will choose Paragraph.


For my handouts (or this year, with 1:1 Chromebooks, send-outs), I will just choose the Short Answer.


For the last piece, a reminder whether I posted anything to Google Classroom, I just used a Multiple Choice question with two options - Yes or No.

 I have taken this form and put a link to it on my Bookmarks Bar in Chrome.
Next post: Now that we are collecting this data. what do we do with it?

UPDATE: I ended up adding two more categories - one for Homework and a follow-up to Post to Google Classroom - If so, then what?

UPDATE #2: I realized that I really didn't need all of this information as the semester wore on. To streamline the process I eliminated the Homework entry and the Handouts entry, as it was duplicated by the What did I post to Google Classroom entry.

Monday, August 1, 2016

Some helpful hints on using Chromebooks

Many people used to using a computer mouse are stymied at first when using the trackpad on the Chromebooks.

The secret to Chromebooks is


You do not need to make the trackpad go "click" when you hit it. Try practicing the gentlest touch you can muster until you can close a tab, for example. You'd be surprised. 

Here are a few (gentle) finger motions to practice on the trackpad.:
Two-finger tap = right click
(using the tips of your index and middle finger together at one time. Gently.)
Two-finger swipe (vertical) = scroll (it's just a gentle rub, a light tickle, up or down the pad with two finger-tips)
I will admit - I have more trouble pulling off the three-finger motions.
Three-finger tap = open link in new tab
(or you can two-finger tap and tap (gently) "open in new tab"
Three-finger swipe (horizontal)  = switch tabs

Thursday, July 28, 2016

Kami - Fill out pdfs online

Several teachers have asked me about making the switch to Google Docs. They are concerned about converting their documents from Word or other text editors (especially some of the Judaics teachers who cling tenaciously to Davka Writer).
 They are also concerned with the problem of formatting - when you start typing on a Google doc, it pushes the blank space between questions forward.

Kami is a Chrome app and extension that opens in your browser and allows you (or the students) to write in blank space in a pdf. (And remember, you can use Share to Classroom to shoot Kami out to your students on the first day of class!)

So if you have a worksheet that in the past was printed out and filled in by hand in class, you can convert them to pdfs (just 'Save As... pdf' in most word processors) and then you can upload them to Google Classroom as Assignments (not Announcements) and have the students fill them out on the Chromebooks. Imagine - no more reading difficult handwriting! Reminder: Make sure to choose 'Make a copy for each student' before assigning.


Installing Kami

Just have the students install the Kami app as well as the extension (which allows for offline work) and when they open the assigned document in Chrome, they should select Open ... Kami.


The first time you (or your students) open a document in Kami, it will ask for access to your Google Drive. 


IT IS CRUCIAL THAT YOU ALLOW THIS ACCESS! Otherwise it will not work with Google Classroom properly, and work will get messed up or lost. (I know, I have a few "tinfoil hat" kids who are paranoid about granting access online, but trust Google and Kami. I've met the designer. He's cool.)

Using Kami

Most features of Kami work without paying for the Pro account. (There's one important exception, as we shall see.) Click on the T to add text anywhere within the blank space.  Kami gives a pretty bright choice of colors for text, but you can click the Settings gear and choose a more subdued, darker, legible color for text.

Begin typing

You just click on the Text button (the T in the circle) and then you can then begin typing normally in whichever language you choose. 

(English has spell-check; Hebrew does not.) And you can go back to your answer later and edit it, which is a feature missing from similar programs.

Saving and Google Classroom

Assuming you have signed in to Kami, the program will automatically save your work as you type.  However, it will not automatically save back to Google Drive unless you are running the Pro version. (Currently $99/teacher/year.)

  This is very important, because if you are assigning the document through Google Classroom the work needs to be saved there as well.

When you click the Sync button on the top right, you can MANUALLY save the file in Google Drive as well. (I say 'as well' because Kami will also keep a copy of it. Which is all the good, because things sometimes get lost.)


However, for this to work properly, the student will have to re-direct Kami to save the document in its Google Classroom folder. (They could move it after they're done and before they're ready to submit their assignment, but I think in the long run it's easier to train them to do it from the start every time.) 

In each student's Google Drive, there is a folder called "Classroom." Within that folder are folders for each of their classes. Within those folders are the files (Google Docs, pdfs, etc.) for each GC Assignment.

The student must first click >→ Move, and then maneuver to the appropriate folder.

 This only needs to be done once per document. But it is crucial for submitting the finished work to the teacher in Google Classroom. If they do not, they will end up returning the original blank document instead of the copy with all their answers in it.

When the student is finished working in the pdf document, they should save it one more time, and then they can head back to Google Classroom. The document in their folder is now the filled-in pdf. Like any other Google Classroom assignment, when they're ready, they can just click TURN IN.


That's it. The teacher gets the completed pdf the same way s/he gets any document through Google Classroom.  And if the teacher uses Kami, s/he can grade and comment on the pdf as well. Postscript: Just in case you were worried, once the pdf is submitted to the teacher, Kami will not allow it to be edited directly by the student.