Showing posts with label Google Docs. Show all posts

Sunday, November 21, 2021

Rashi Script in Google Docs!!!!

Rashi Script for Google Docs

Forgive the overuse of exclamation points, but GOOGLE DOCS HAS RASHI SCRIPT!!!


This is huge!

This was perhaps the last reason I continued to prepare worksheets in Word, and now Google has Rashi script. This is certainly a game-changer for teachers of Jewish texts.

How To Get It

The font (Noto Rashi Hebrew) can be loaded through the Google Docs Add-On Extensis Fonts.

See this previous post to learn how to add it to your Google Docs toolkit.

Hebrew Fonts in Extensis Add-On

Once you have added Extensis to your Add-Ons,  type or paste some text into Google Docs. I have grabbed the first Rashi on Chumash from Sefaria.


Highlight the text.

Go to Add-Ons in the Google Doc Menu bar and choose Extensis Fonts. Click Start.


Scroll down to Noto Rashi Hebrew. Click on it.


Your text should now be in Rashi script. 

The new font, Noto Rashi Hebrew, should now appear in your font list, ready to use whenever you need it.


Two caveats: The tzadi is oddly stylized. Stop kvetching. I am sure with enough exposure, we can all get used to it. [UPDATE: I discovered over shabbat that this is Steinsaltz's Rashi script.]


The Tzere Workaround


UPDATE: The Tzere has been fixed. It looks normal.

The second caveat is, as mentioned in the comments, that the tzere is really unrecognizable.
The workaround (admittedly a bit of a pain, but a worthwhile trade-off in my opinion if you need to use Google Docs with Rashi and nequdot) is as follows:

In Hebrew typing mode, place your cursor after the offending tzere, and hit backspace. This will delete the vowel. 
Go to the font list in the menu bar and change the font to one of the following (other fonts may work too; this is the result of my own experimenting):
Miriam Libre
Courier New
Tahoma.

Type the tzere (older PCs: Caps Lock, Shift+5; Chromebooks and some newer PCs, AltGr+M)
Repeat as necessary.

For more information on Hebrew and Google Docs, see my other posts:


Also search the tag "Hebrew" on this blog.

Thursday, June 25, 2020

Hebrew Vowels (Niqud) for Google Docs on Chromebooks

I have figured out how to insert vowels into Google Docs on a Chromebook. If this is documented fully anywhere, I haven't found it. Wikipedia is blank on this.

This is for Chromebooks and some newer PCs. It does not work on older PCs. (For Niqud in Windows, see this post.)

If you need a refresher on setting up Hebrew in Google Docs / on a Chromebook, see my post here.

The key (pun fully intended) to doing this is the Alt Graph key, often abbreviated AltGr. Don't panic. You do so have one. It's the Alt Key to the right of the spacebar.


When you are in Hebrew on a Chromebook (Ctrl + Spacebar to switch back and forth), position the cursor after the letter under/over which you wish to insert a vowel. Hold the AltGr (again, the Alt Key to the right of the spacebar) plus the following keys to insert niqqud.

(There's kind of a mnemonic to it - for many of the basic vowels, the key is the Hebrew letter that begins the name of the vowel. So [AltGR +] the ח'‏ key (J) for חירק; the צ'‏ (M) for צירה, the ד'‏ for דגש; the ש'‏ for שוא. The תנועות חטופות are immediately to the right of their counterparts. So פ'‏ (P) for פתח and the [ key for חטף פתח; the ק'‏ (E) for קמץ and the ר'‏ (R) for חטף קמץ; and the ס'‏ (X) for סגול and the ב'‏ (C) for חטף סגול.  The ו'‏‏ (U) is also the dot for the חולם. The backslash \ looks like a קבוץ, I guess.
Since the A is the ש'‏ key, the key to its upper right (W) puts the dot for the shin, and the  key to its upper left (Q) puts the dot for the sin.)


Key Combo
Vowel / Symbol
AltGr + E (ק)
קמץ
AltGr + R (רׂׂ)
חטף קמץ
AltGr + P (פ)
פתח
AltGr + [
חטף פתח
AltGr + X (ס)
סגול
AltGr + C (ב)
חטף סגול
AltGr + U (ו)
חולם dot
AltGr + J (ח)
חירק
AltGr + M (צ)
צירה
AltGr + S (ד)
דגש (also the dot for שורק)
AltGr + A (ש)
שוא
AltGr + \
קבוץ
AltGr + W
dot for שִׁין
AltGr + Q
dot for שִׂין
AltGr + 7
מתג
AltGr + -
מקף
AltGr + ‘/” 
גרשים a/k/a tzupchik -  רש״י
AltGr + `/~
ר׳ - גרש
AltGr + ;
Bottom of the line quote mark - „
AltGr + 
Quote mark proper direction - ”
AltGr + 4
New Israeli Shekel NIS
AltGr + ]
רפה mark - רֿ
Niqqud for Chromebooks  © Jeff Kuperman 2020


Downloadable copy can  be accessed here.

Tuesday, June 2, 2020

For Students: How to upload work to Classroom

Since there are still students who do not know how to do this (How is this possible?!), here is a tutorial.

Click on the assignment in your Due list


Under Your work, click on Add or Create


Attach your Google Doc and submit.


Tuesday, March 12, 2019

Coolsymbol.com - fun stuff (and a very useful tool for Hebrew)

Check out coolsymbol.com. It is full of fun symbols to dress up your docs, neat text effects and all other sorts of goodies.

Just look at all the different star symbols to use in place of a boring asterisk:


Just click on anything and it loads into your clipboard.

It has so much more than the Insert Special Character in Google Docs. 

But if you scroll all the way down to the bottom of the home page, there's something very useful for Google Doc workers in Hebrew or Arabic or any other Right to Left language: Other Special Non-Printing Characters. [UPDATE: This can be done manually on Chromebooks. See below.]


The one we want is the very last one - Right-To-Left Mark.

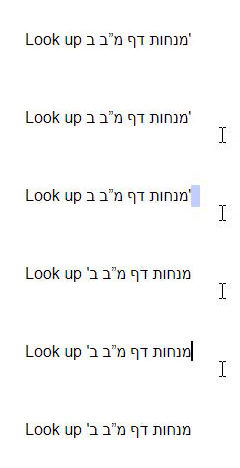
If you've ever put a punctuation mark after a Hebrew word in Google docs (like a single quote, a/k/a גרש, a/k/a tchuptchik) you know the frustration of having it go to the other end of the sentence.
Click the Click to Copy box and after you type the גרש, hit ctrl+v and the mark will magically jump back to where it belongs.

Image from Gyazo

(This is one of the many reasons I still write my multilingual English/Hebrew documents in Word rather than Google Docs; Word keeps going right to left until you switch back to English.)

UPDATE: Manual method for Chromebooks only.
After you type the גרש and it goes to the wrong side, switch to English and hit Ctrl+Shift+U. You'll see an underlined u. Type 200F and hit enter. This will insert a RLM (Right-to-Left Mark)
I didn't say it was easy, just manual.


Hebrew Formatting from Word to Docs

If you have ever tried to save a multilingual Word Doc mixing right-to-left and left-to-right text as a Google Doc, you know that the formatting can often get messed up in the transition.

(Full confession: I still write most of my tests in Word. It still handles Hebrew better than Docs.)

However, if you paste the Word doc into a blank Google Doc, the proper formatting is preserved.

The one thing that gets changed is - if you use automatic numbering in Word, the numbers will get pasted into Docs as regular text, not automatic updating numbers. Not a deal-breaker for me. The upside outweighs the downside.

Saturday, October 20, 2018

Line Numbers for Google Docs now works for Right-to-Left docs as well

One of the things that kept me using Microsoft Word is the line number feature. When teaching texts to students, it helps to be able to direct them to the right line easily.

The useful Google Docs extension Line Numbers for Google Docs adds line numbers along the left side of the page. But what if your document is a Right-to-left document, like Hebrew or Arabic?

Thanks to extension designer Pablo Gamito, the extension now easily handles such documents. (I e-mailed him on Friday and he updated the extension the very next day!)

EDIT: Two caveats - the numbers do not appear in a shared document (although there's nothing stopping the recipient from installing and utilizing the extension herself) and they are not retained if you use Download as pdf, although if you use Print to pdf, they are preserved. This has dampened my enthusiasm somewhat.

Install the extension from the Chrome Store. Once in a Google Doc, click the extension and choose how many lines (every one, every five, etc.) you want numbered.


Click on "Show More Options"


There are many ways to customize the numbering, as you can see. Choose the last item to have the numbers appear on the right.

If the numbers don't appear immediately, click Reload Google Docs Page. And voila!


If this is useful, be sure to give the extension a positive rating on the Chrome Store. And if your corporate / school account is like ours and won't let you log in to the Chrome Store even if you can download extensions, log in under your personal account and give the designer the thanks he deserves.


Wednesday, September 5, 2018

Posting documents on Google Classroom that don't need to be submitted

[UPDATE: Google Classroom has fixed this problem with the addition of the Post Material option, so this post is moot.][Does Google ever run their updates by actual teachers?! ]

I have a particular problem with the new Google Classroom - you can't assign a topic to an announcement.

So if I want student to be able to go back and locate a worksheet or a text document to study for a quiz or test, I have to post it as an assignment, so the posts are organized by topic.

But if I am sending out a graphic organizer on Google Docs, I want the students to have their own copy, and I don't want them to have to submit the document back to me - it's there for them to use, and to train them to take notes.

I tried to do it as I did last year, but it didn't work.

Unfortunately, as teachers we cannot see what the student gets when we post something. Luckily I have a fake student account, and recently I went back and forth through 4 different attempts until I got what I needed.

To wit:
1. Send out as an Assignment so that it can be grouped with the other worksheets and easily retrieved later.
2. Force each student to make a copy of the original document so that each student is working on his/her own copy
3. Not require them to return the document to me, but just to click the MARK AS DONE button.

The Process

Step One: Create your document on Google Docs.


Step Two: Change the Sharing settings from Anyone with the link can edit to Force everyone to make a copy.

You can do that manually (see directions here) or you can use the Sir Links-a-Lot Chrome extension (see post here).
Make sure the new link is saved to your clipboard.

Step Three: Open Google Classroom and Create an Assignment.


Name the assignment, change the Points Value to "Ungraded," do not assign a Due Date, and assign a Topic.


Do NOT use the Add Link feature! Paste the force-copy link on the Instructions line, and click ASSIGN.

This is what the student sees:


Student clicks on the link and it opens another window and forces them to make a copy. Student can then just click MARK AS DONE and clear the "assignment."

Sunday, July 8, 2018

Text to table: Making a vocabulary chart from text in Google Docs or Microsoft Word

SPOILER ALERT: This is slightly easier in Word.

Let's say you want to create a vocabulary chart in Chumash for students to fill in the שורש, as well as prefix(es) / suffix(es) and translation. (This works in any language; I'm using Hebrew because it's what I teach.)

PART ONE: GOOGLE DOCS

If you stay in Google Docs, the only way to do it is create a table, and drag each word into one of the cells. Which is doable, but it's a slog.

However, by using Google Sheets, we can in effect convert text to a table.
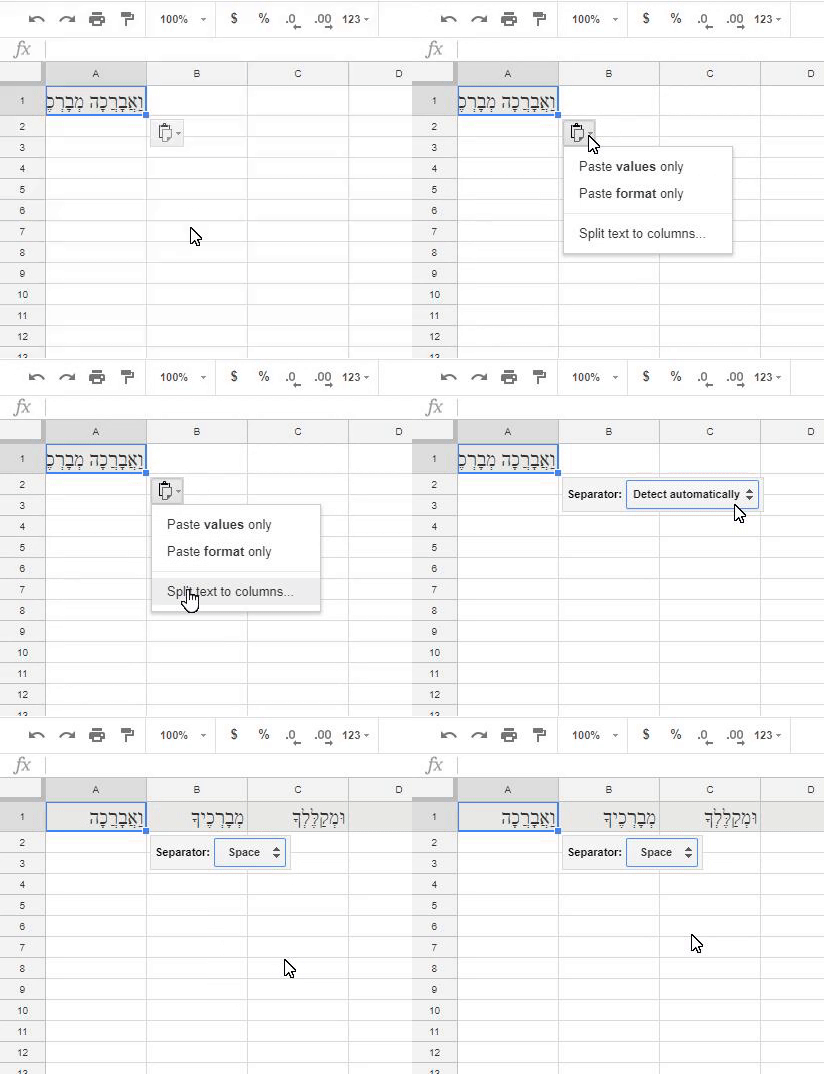
Begin by copying the פסוק from any online site with text (like Sefaria) and paste it into the first cell of a Google Sheet.

Image from Gyazo

However, this leaves all the words crunched up in one cell. Not useful.

Click the little "clipboard" icon that pops up next to the cell (or if you miss it, go to Data | Split Text to Columns), and choose Separator: Space. This will put each word in the verse in a separate cell in the same row. Still not what we want, but one step closer.

Image from Gyazo


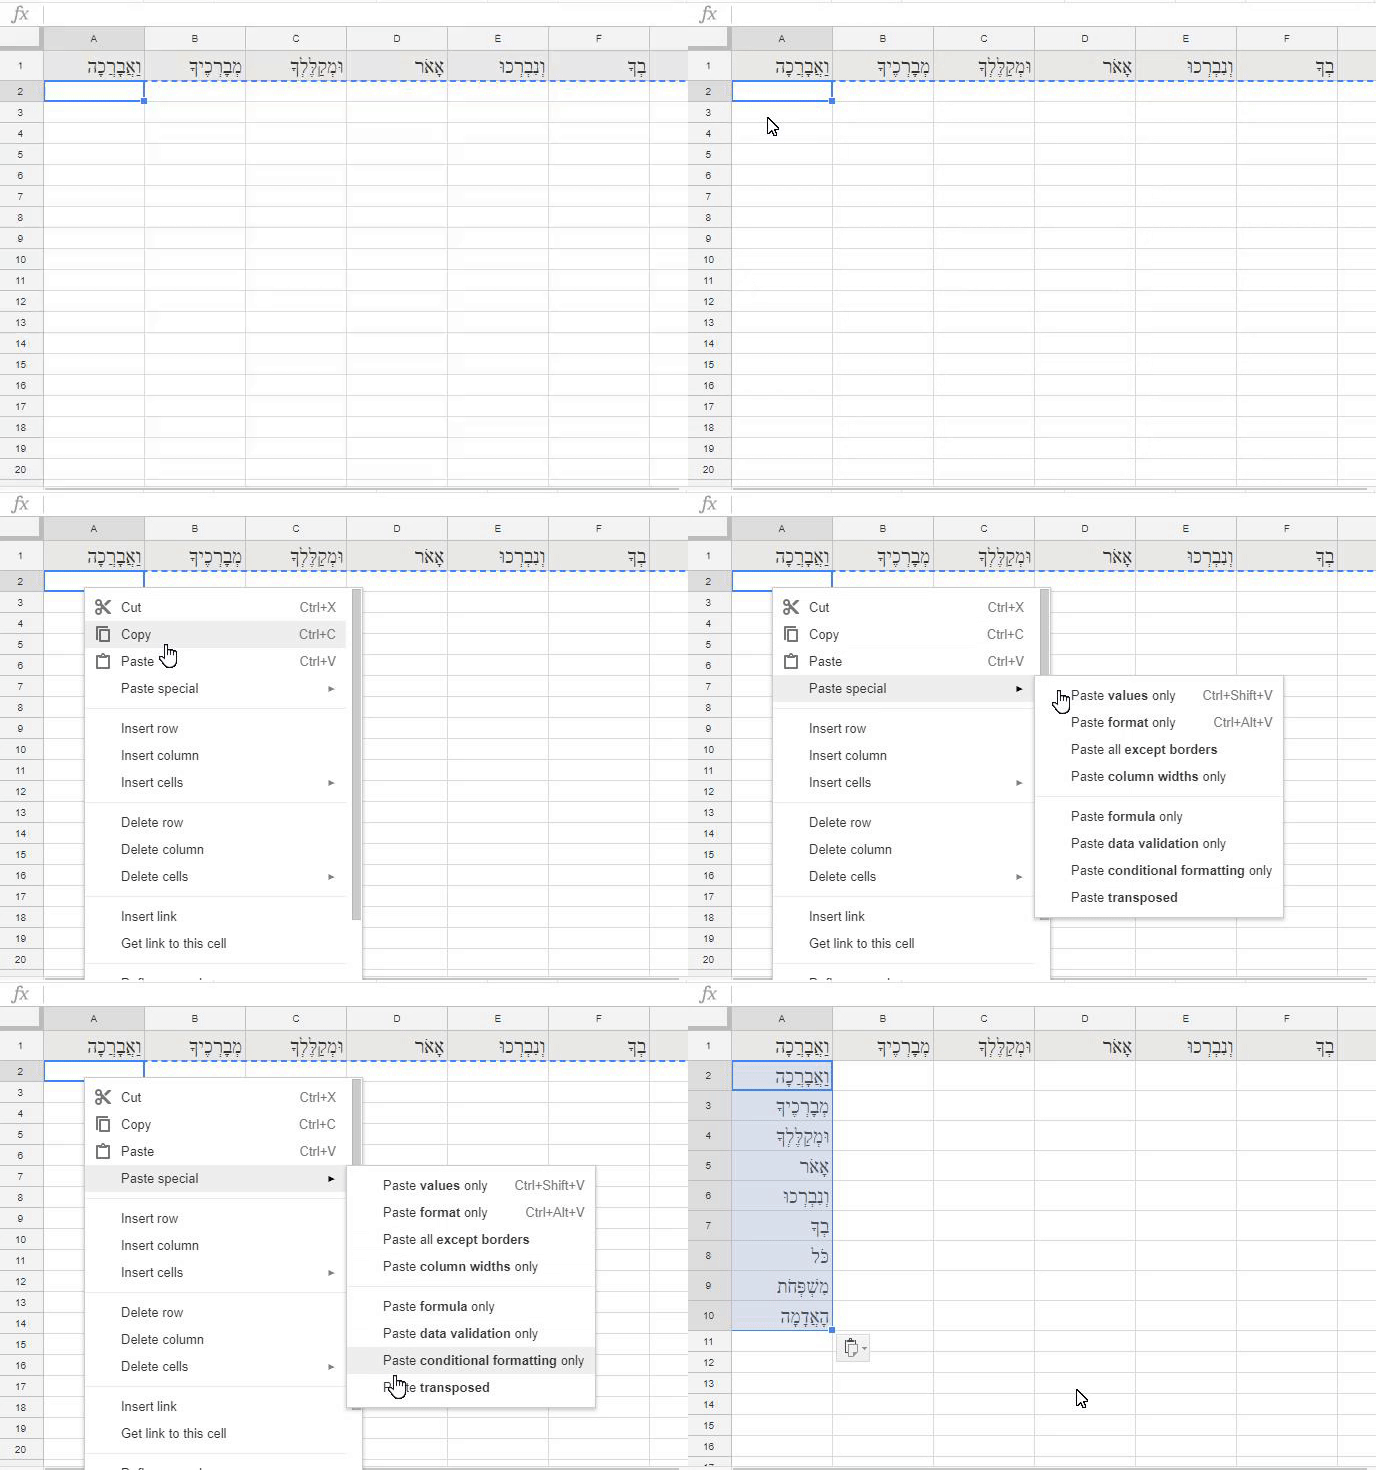
Highlight all the words in the row and copy (either Ctrl+C or Edit | Copy)

Image from Gyazo


Now RIGHT-click in the first cell of the 2nd row (2A) and select Paste Special | Paste transposed. This will now paste all of the words in the first column, which is what we need.


Image from Gyazo


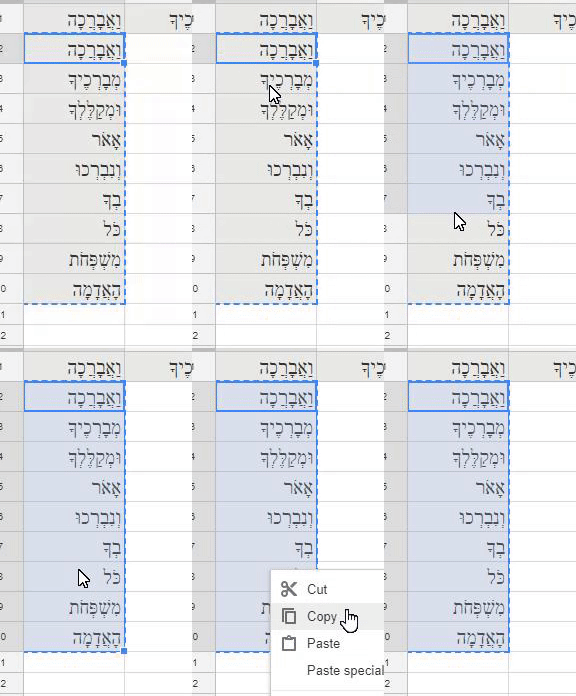
Now just highlight and copy the column (ignoring the first row).


Image from Gyazo

Now you can go to Google Docs and paste this table into a new doc. You can choose Paste unlinked.


Right click and add as many columns (to the left, if you're doing Hebrew) as you need.


PART TWO: MICROSOFT WORD

As promised, word makes it slightly easier.

Paste your verse / sentence etc. into Word

Highlight it, and go to Insert and click on the arrow at the bottom of the Table icon, and choose Convert Text to Table.


The default will be the number of words as columns. You want to reverse that, and change the number in the Columns box to 1; the number of rows will change automatically to the number of words.


Where is says Separate text at: choose Other and hit the SPACE BAR once. Then hit OK.
This will place all your words in a single column, one word per cell. From here you can add columns, delete rows for words you don't want to feature, etc.


Tuesday, May 29, 2018

CheckMark Extension adds years to your life

[UPDATE: The new Comment Bank feature in Classroom makes this extension obsolete.]

Well, maybe not years, but I probably just saved over an hour of typing the same comments on 40 tests. It adds up.

CheckMark is an extension that lets you add customized comments (or canned comments if you teach English Composition on the grade level it's aimed at) on Google Docs at the click of a button. They can be as long as you need, and can include multiple languages, symbols or anything else you can put in a Google Docs comment (i.e. no special formatting).

Go the Chrome Store and get CheckMark


When you install it, it will appear in your Chrome Menu in the upper-right hand corner.


If the first time you click it it does not say Enabled, enable the extension.

At first it will present you with a list of canned comments for English Comp. If they work for you, enjoy. If they do not, you can delete every single one by clicking the red X.

Here's where it gets useful. Let's say you start grading and soon realize that several students have made the same mistake. Do you want to type "I think you confused Jefferson Davis and Thomas Jefferson" on 40 Google Docs? I didn't think so.

So let's go:

Click on the Extension, and then on the Preview Edit Pencil.

Click on the green + sign. Give your comment a 3-4 letter abbreviation so that you can readily identify it, and type (or paste) the comment you're going to be re-using. Click Apply.


I, by the way, ended up with about 11 "stock" comments for this particular test.

Back in Google Docs, when you come to one of those answers...

 Highlight a word in the answer, and the CheckMark bar will appear translucently above the line.

If you hover your cursor over the little blue box it will get darker and he comment will appear in a hover text box, just to be sure you're choosing the correct response.
 Click the blue box and CheckMark will automatically enter the pre-selected comment into Google Docs comments and close the comment box.


Downsides: If you're moving among different assignments, and you don't need CheckMark for one class, (mine were VERY test-specific) the only way to silence it is to [click the 3 square dots at the top-right of your Chrome browser] go into More tools, Extensions, and temporarily disable the extension.
Also, I have had limited success with it fully syncing between computer, and have gone home and not found all of my added comments available.
But I suspect these will get ironed out in future iterations.

I still think it is a fantastic addition to my Google Docs tool case.


Some nice Hebrew fonts for Google Docs

It's always nice to play with typography to make our Google Docs stand out.

The Extensis add-on to Google Docs can give you access to hundreds of new fonts.

(In any Google Doc, go to Add-ons, click "Get Add-ons", and search for Extensis. Select it, choose your account and click Allow.)

So how many of those fancy fonts work for Hebrew? About 15 - 20. (and no Rashi yet)

Check them out here. The page will show you what they look like.
(Here is a partial screenshot)


Or just search in Extensis for the following fonts:
Alef, Amatic SC, Arimo, Assistant, Bellefair, Cousine, David Libre, Frank Ruhl Libre, Heebo, Miriam Libre, Rubik, Secular One, Suez One, Tinos, Varela Round

[Cousine has weird spacing issues with the letter ו"ו, and Secular One and Suez One are bold poster-like fonts.]

To the above list I will also mention Cardo and Tahoma, which can be found in Extensis as well.

If you know of any more, please let me know in the comments.


Monday, November 6, 2017

Supercharge your Google Apps with Add-ons and Chrome with Extensions


ICYMI - From today's Mimi Charnoff Professional Development Day, my list of my go-to Add-ons for Google Apps (Docs, Forms, Slides) and my favorites extensions for Chrome.

REMINDER: Extensions only work in Chrome on a Chromebook, a PC or a Mac. They do NOT work on Chrome on a phone or tablet (iPad, etc.) as they are not true Chrome browsers.


Google Doc Add-ons
Change Case
For those typing mistakes - ALL CAPS all gone
Extensis Fonts
Find precisely the right font
Kaizena
Add voice comments to a shared doc thru Google Classroom
Highlight Tool
Share labeled highlighter categories
Sefaria
Add Jewish texts directly to docs
In an open Google Doc, go to Add-ons.

Google Form Add-ons
123RF Stock Photos
Free photos to insert into Forms
All Questions Required?
For Quizzes - Click when finished
CheckItOut
For keeping track of inventory
Form Publisher
Convert to Doc, Slide, Sheet
Form Limiter
Limit time or number of responses
PaperScorer
Create bubble sheet from form - scan w/ phone to score


Google Slides Add-Ons - NEW!
AdobeStock


Free photos to insert into Slides
ShutterStock
Unsplash Photos
Pear Deck
Create formative assessments and interactive slides
Slides Toolbox
One-click for repeated tasks


Supercharge Chrome with Extensions
Edit Microsoft Office files with converting to Docs, etc.
Save articles to read later
Blocks ads online
Does what it says
Post or push site to Google Classroom
Click and e-mail webpage
Save directly to Keep
Declutters distracting pages
Declutter and open multi-page articles
Create a temp, real-word URL shortcut
New tabs open blank
Double-click on a word for its definition
Turn all your tabs into 1 link page
Translate, transliterate into other languages
On-screen tutorials within Google Apps
If you need to insert foreign accents
Opens Rediker in parallel window from Classroom
Opens up to 20 docs in separate tabs