Showing posts with label Google Classroom. Show all posts

Thursday, August 27, 2020

Organize Google Classroom Visually

 Three suggestions for keeping Google Classroom manageable.

1. Keep the Announcements page free of assignments.

I heard an Ed Tech guru describe the Announcement page of Classroom as the cyberspace equivalent of the first minutes before class starts, where conversations take place; the Classwork page is where the class takes place.

Click of the Settings gear in the upper right corner of your Classroom page.

Scroll down to Classwork on the Stream and change the setting to Hide Notifications

.


If you'd like to use the Stream for comments, student questions, and teacher announcements, on the Stream setting, choose Students can post and comment.


2. Always Use Topics

Whenever you add anything to your Classwork, ALWAYS assign a topic. Come up with a system that is logical and consistent and use it, consistently. For some classes, I chunk topics by units (Chapter or Subject units), or by type of work (Classwork/Homework/Reviews).


The student can find grouped assignments by topic on the left side of the page.


Don't go overboard with Topics. Keep them manageable, logical, and consistent.

3. Add simple emoji icons to the title of your post for visual cues

I have a stable of about 15 emojis that I use consistently, especially for my weaker classes with learning issues, to help them visually organize what is posted. I keep them in a Bookmarks folder in Chrome labeled Emojis. Whenever I am posting anything, I keep an open tab for emojis.

My source is the Emojipedia.

Here is my collection:


These are all bookmarks in the Emojipedia. After I search through it and find one that I think is appropriate,  I bookmark it and change its name to whatever function I intend for it.

Here are some in use in last year's class:


If you've never edited the name of a bookmark, it's very simple.
Let's say I want to add a symbol for an assignment while I'm out sick.

I search Emojipedia and find this.


I decide on the Face emoji, click it, and am brought to its page. I click the little star in the Address Bar.


Before clicking Done, delete the name of the Emoji and rename it whatever you want to use it for.


And then click Done.

When you open the bookmark in a separate tab, click on the Copy button and the emoji will be copied to your clipboard.


 Then paste it in the title of your Classroom post.


Tuesday, June 2, 2020

For Students: How to upload work to Classroom

Since there are still students who do not know how to do this (How is this possible?!), here is a tutorial.

Click on the assignment in your Due list


Under Your work, click on Add or Create


Attach your Google Doc and submit.


Tuesday, December 10, 2019

YouTube "Videos Not Aproved"

You may have noticed lately that if you access YouTube on your school account, you will now see a blue bar with a message that reads "Video not approved for mjbha.org" and a white "Approve" button.


What's going on?


A teacher tried to leave an educational video for students to watch in her absence, but the students could not access it.

It turns out that the newly reconfigured blocking software is keeping an awful lot of useful videos out of our students' hands.

IT has now set it up so that if you wish to share a video on, say, Google Classroom, you can approve the video for school use. When you share the link with the students now, they will be able to open the video in school.

How to share videos


If you need a refresher on how to share videos, I'll run through the easiest method.

Once you've clicked "Approved," click on the curved arrow that says Share under the video. Copy the URL (https://youtu.be/etc.) that appears in the box beneath.


Go into Classroom and set up a post.  Click the Add Link symbol  (orange arrow in the picture) and paste that into the Add Link pop-up box in Classroom and click Add Link (yellow arrow) and then hit Post.


Wednesday, September 5, 2018

Posting documents on Google Classroom that don't need to be submitted

[UPDATE: Google Classroom has fixed this problem with the addition of the Post Material option, so this post is moot.][Does Google ever run their updates by actual teachers?! ]

I have a particular problem with the new Google Classroom - you can't assign a topic to an announcement.

So if I want student to be able to go back and locate a worksheet or a text document to study for a quiz or test, I have to post it as an assignment, so the posts are organized by topic.

But if I am sending out a graphic organizer on Google Docs, I want the students to have their own copy, and I don't want them to have to submit the document back to me - it's there for them to use, and to train them to take notes.

I tried to do it as I did last year, but it didn't work.

Unfortunately, as teachers we cannot see what the student gets when we post something. Luckily I have a fake student account, and recently I went back and forth through 4 different attempts until I got what I needed.

To wit:
1. Send out as an Assignment so that it can be grouped with the other worksheets and easily retrieved later.
2. Force each student to make a copy of the original document so that each student is working on his/her own copy
3. Not require them to return the document to me, but just to click the MARK AS DONE button.

The Process

Step One: Create your document on Google Docs.


Step Two: Change the Sharing settings from Anyone with the link can edit to Force everyone to make a copy.

You can do that manually (see directions here) or you can use the Sir Links-a-Lot Chrome extension (see post here).
Make sure the new link is saved to your clipboard.

Step Three: Open Google Classroom and Create an Assignment.


Name the assignment, change the Points Value to "Ungraded," do not assign a Due Date, and assign a Topic.


Do NOT use the Add Link feature! Paste the force-copy link on the Instructions line, and click ASSIGN.

This is what the student sees:


Student clicks on the link and it opens another window and forces them to make a copy. Student can then just click MARK AS DONE and clear the "assignment."

Tuesday, September 4, 2018

The fastest way to collect data - Google Classroom Questions

I finally got my textbooks! 😊
I had to distribute them to my classes, but I did not have a class roster on which to write down all the book numbers.🙁

Solution: Google Classroom | Classwork | + Create button | Question:


Question: What are the last 4 digits of your bookplate number?

Points: Ungraded

Due Date: No due date

Topic: Question

And voila. Instant data collection. I just copied the Turned in work and pasted it into Notepad, which strips out the formatting and saved the list.


Tuesday, August 21, 2018

Archive your old classes!

Did you know that until you archive your old classes they still show up on the students' Google Classroom?

Time to clean up!

Go to you main Google Classroom page.

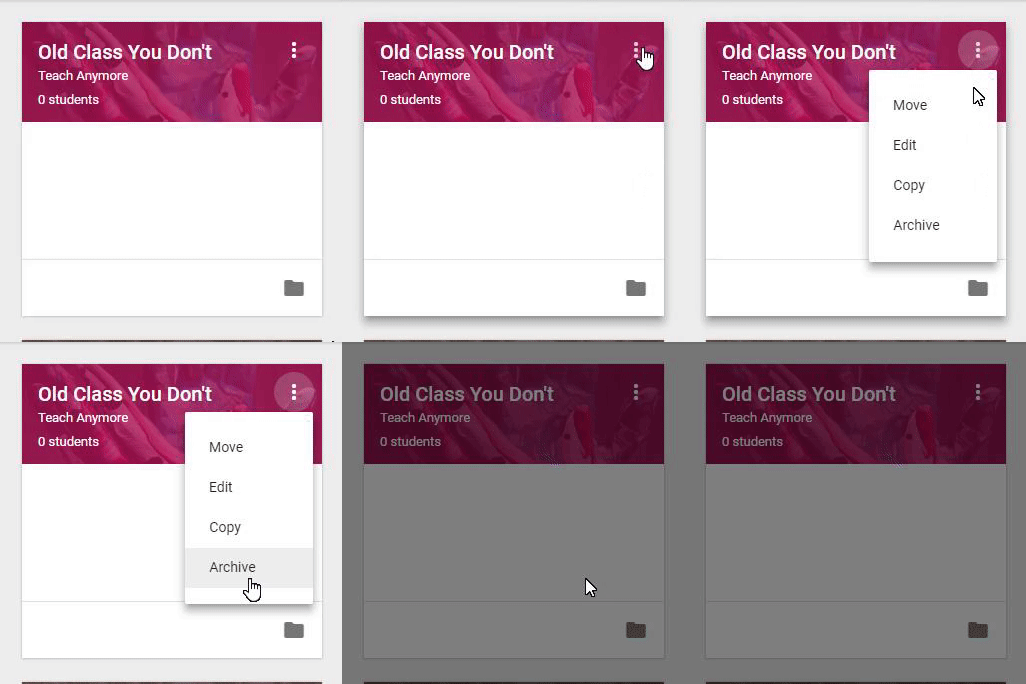
In the upper right corner of each class are 3 dots.

Click the 3 dots.


Image from Gyazo

Choose Archive. Then confirm that you really want to archive the class.


All done!

But wait!

What if you want to get the class back? What if you forgot there was something there that you wanted to re-use for this year? Is all hope lost? Is it gone forever?

Never fear!

On you main Google Classroom page, click on the 3 lines in the upper left corner (affectionately known as "the sandwich") and scroll down to the bottom. 

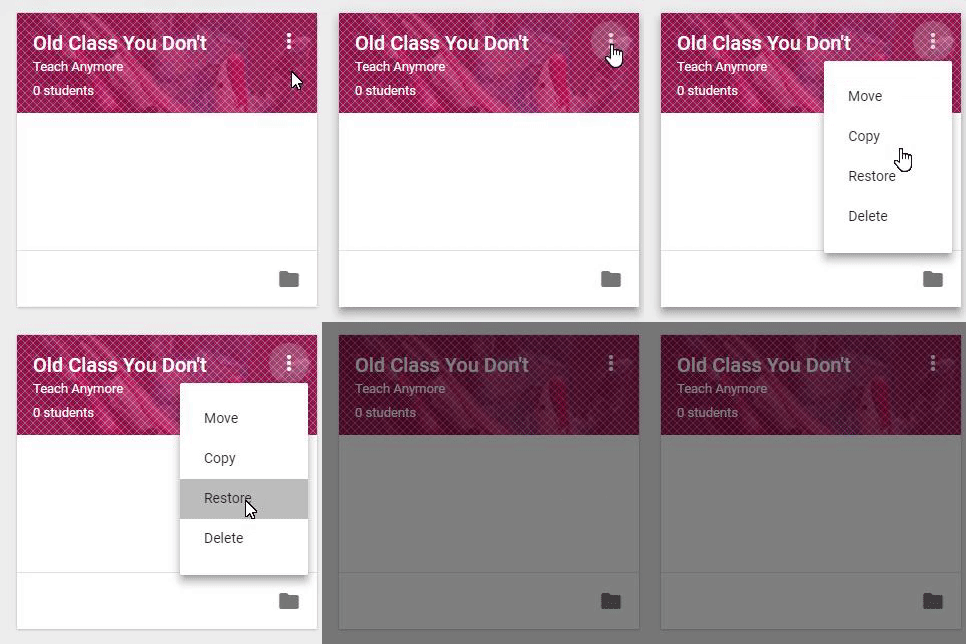
Click on Archived Classes. All of your archived classes from days of yore will appear, kind of cross-hatched and fuzzy, like ghosts from the past through a screen door.

Choose the class you need to resurrect, click on the 3 dots and choose restore.

Image from Gyazo

But remember! When YOU restore the class, it will reappear in any of your old students' Google Classrooms as well. {EDIT: So go to People, click the top checkbox at the top of the Students list. This will choose all of the students. The Actions drop-down menu will become active. Click on the arrow and choose Remove. ]


Monday, November 6, 2017

Supercharge your Google Apps with Add-ons and Chrome with Extensions


ICYMI - From today's Mimi Charnoff Professional Development Day, my list of my go-to Add-ons for Google Apps (Docs, Forms, Slides) and my favorites extensions for Chrome.

REMINDER: Extensions only work in Chrome on a Chromebook, a PC or a Mac. They do NOT work on Chrome on a phone or tablet (iPad, etc.) as they are not true Chrome browsers.


Google Doc Add-ons
Change Case
For those typing mistakes - ALL CAPS all gone
Extensis Fonts
Find precisely the right font
Kaizena
Add voice comments to a shared doc thru Google Classroom
Highlight Tool
Share labeled highlighter categories
Sefaria
Add Jewish texts directly to docs
In an open Google Doc, go to Add-ons.

Google Form Add-ons
123RF Stock Photos
Free photos to insert into Forms
All Questions Required?
For Quizzes - Click when finished
CheckItOut
For keeping track of inventory
Form Publisher
Convert to Doc, Slide, Sheet
Form Limiter
Limit time or number of responses
PaperScorer
Create bubble sheet from form - scan w/ phone to score


Google Slides Add-Ons - NEW!
AdobeStock


Free photos to insert into Slides
ShutterStock
Unsplash Photos
Pear Deck
Create formative assessments and interactive slides
Slides Toolbox
One-click for repeated tasks


Supercharge Chrome with Extensions
Edit Microsoft Office files with converting to Docs, etc.
Save articles to read later
Blocks ads online
Does what it says
Post or push site to Google Classroom
Click and e-mail webpage
Save directly to Keep
Declutters distracting pages
Declutter and open multi-page articles
Create a temp, real-word URL shortcut
New tabs open blank
Double-click on a word for its definition
Turn all your tabs into 1 link page
Translate, transliterate into other languages
On-screen tutorials within Google Apps
If you need to insert foreign accents
Opens Rediker in parallel window from Classroom
Opens up to 20 docs in separate tabs

Thursday, March 30, 2017

Force a copy in Google Docs link

When I share worksheets with my students in Google Classroom, I don't want to post it as an Assignment, because I don't want the students submitting it back to me. I want them to hold on to it to study from.

If I post it as an announcement - if they can edit it, it will become one shared document with everyone working on it. Sometimes I want that, like when they are reviewing as a group.

But sometimes I want each student to do their own work. If I share as view only, then they can view the document, but they can't edit (i.e. write on) it. That's okay for in-class reading, but obviously inappropriate for worksheets.

If I ask them to make a copy of the document, there will always (and I means always) be a few who do not and then can't figure out why they can't write on it.

The trick is to force them to make a copy.

When you have completed the Google Doc, click SHARE, then click Get shareable link.


Click Copy Link.


Now, in Google Classroom, create an announcement, and on the description line, paste the link (Ctrl+V) where it says Share with your class.

The link will be a long string of gibberish; focus on the end.

https://docs.google.com/.../edit?usp=sharing

Position your cursor and delete the word edit and replace it with copy.

When they click on that link, they will be confronted with this:


Their only choice is to to click Make a copy.

Wednesday, September 21, 2016

Training for Google Apps

Don't walk, RUN! Run to the Chrome store and install the extension for Training for Google Apps.

Have you ever been stymied, wondering how to do something in Gmail, or Google Classroom, or Docs, or Slides, or Sheets or Forms, to name a few? Did you know you can have a built-in tutorial that doesn't even require you to leave the browser window in which you are working?

Whenever you go into various Google Apps for Education, you will see this little symbol in the right-hand corner:


Click on it and a searchable menu will pop up.


There are lots of items to choose from, or you can search for help on a specific topic. When you choose an item, either a video window will overlay on the screen with a tutorial, or you will get actual prompts (like CLICK HERE) that walk you through the steps.


I've already learned how to do several things that I never thought possible in Google Docs! Give it a try today!

Monday, August 29, 2016

Binary files and How to Avoid Them in Google Classroom

Hit my first snag before my first classes started. I uploaded a Google doc to Google Classroom and it appeared with the words "Binary File" instead of Google Doc.


The result was that although I could open it, my students could not.

Turns out, it was my fault.

When you upload a Google Doc, you can choose the paperclip (upload from your computer) or the Google Drive symbol (upload from Google Drive).


If you have Google Drive installed on your computer, either one should be able to work, but that's where I messed up.

You have to upload Google Docs from Google Drive; do not use the paperclip!

The binary file is actually a link to to the URL of the Google Doc. Since both reside on your computer, it will work for you. But it won't work for your students.

Friday, August 26, 2016

Inviting a Co-Teacher to Google Classroom

Sometimes you may wish to share your Google Classroom with another teacher. Perhaps you are teaching two sections of the same class and want to know what the other is doing. Perhaps you have a Sulam shadow or ESS caseworker who wants to stay on top of a student's workload.

Here's how to do it.

Open the class and go to the ABOUT tab.


Under your name (and picture, if you've linked one with your school account) it says INVITE TEACHERS.

That's it.

Wednesday, August 24, 2016

Archive Last Year's Google Classroom Classes

Miriam reminded me of this piece of housekeeping.

Clear out last year's classes from Google Classroom.

Go to your main page, click on the old classes at the three dots in the upper right-hand corner.

Choose archive. The class and all its postings will be retained in your Google Drive in the folder "Classroom," but won't clutter your main page.


ADDENDUM: If, like me, you teach the same sections each year, naming the class in Google Classroom can get confusing - in your Google Drive Classroom folder, you'll have several folders labeled "9th Grade Biology" or whatever.

You can go into your Google Drive Classroom folder and rename the old classes to avoid confusion. (Right-click > Rename) I just place an "X" at the beginning of the inactive folders.

ADDENDUM 2: Sometimes I just don't think. 
Go into your classroom folder, make a new folder (NEW > Folder) and name it with last year's date (e.g. "2015-16").
Move all of last year's folders into this folder. SO much neater. 

Tuesday, August 23, 2016

Individual copies in Google Docs

A teacher came to me with a very specific need. He wanted to send out a note-taking template - that he used to xerox and hand out - as a Google doc.

He did not want to have to collect them, so he did not want to use the Assignment feature of Google Classroom with "EACH STUDENT WILL GET A COPY." But he also wanted the option of being able to look at them on line to see how their note-taking skills were progressing.

He did not want to convert it to a pdf and have the students write on it with Kami, because he wanted them to have as much space as they needed to write.

He was also concerned about document spacing - when the students would type in the allotted space on the document, it would push all the white space he had previously created for the students' handwriting.

Spacing


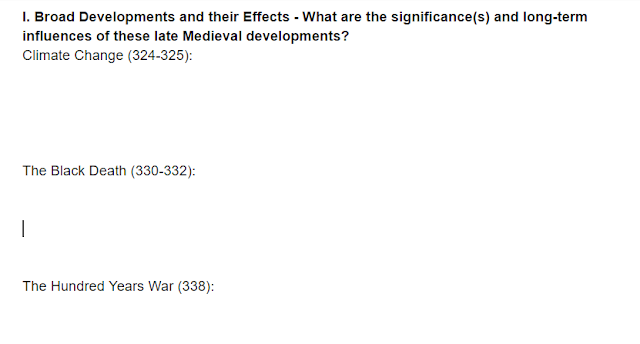
The last problem just required some creative editing. I suggested that rather than leave all the white space, he should just add "RESPONSE - " (or the appropriate prompt) after the question and leave one blank line after that. The students can place their cursor after the word "RESPONSE - " (or whatever) and they can type as much as they like for each question.

So from this...


to this.


Sharing


Deciding how to share the document with all his students, allowing each student to get his/her own copy (no collaborative note-taking!) took some more experimentation. If he just shares the document with the entire class, everyone will be writing on the same document.

The best way to meet all of his expectations is:

Share the Google doc with the class as a Can View.


The students will not be able to write anything on it.

Then the students should be instructed to make a copy of the document. (File > Make a Copy) . The new file will be called Copy of [Whatever the file was named].

Instruct the students to replace "Copy of" with their name, and to share it with the teacher.

This satisfies all the requirements - each student gets his/her own copy, and the teacher can view them when needed and offer feedback or encouragement.

Sunday, August 7, 2016

Lesson Planner Lost & Found

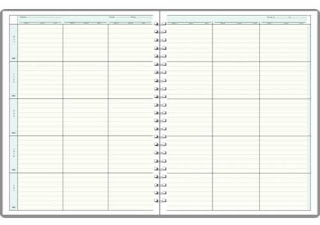
Although I have moved much of my life online (attendance and grades, file storage, bill paying, shopping) I have yet to find an online app or program that could replace the same type of wire-bound lesson planner that I've been using for 28 years.
I wasn't sure what I was looking for, exactly, but I felt, as Justice Potter Stewart said in an entirely different context, that "I [would] know it when I see it."

I finally found a fully customizable program that gave me exactly what I wanted (more on that in a bit), only to be disappointed to receive an e-mail that it was eliminating the free version, and the features that I wanted would now cost me $14.95/month. No thank you. I could get HBO for that.

But having had the program, albeit briefly, it finally clarified for me the criteria I needed to design one on my own. I wanted something that would differentiate between my classes, add a date stamp, give me room to describe what I taught, what got sent out to my students and whether I posted any handouts or SMARTBoard notes to Google Classroom.

The first part of my solution has been Google Forms. (I know, right? It was there all along along, like the Purloined Letter, or the ability to go back to Kansas.)

If you're unfamiliar with Google Forms, I'll provide a brief tutorial. If you are familiar with it, check out the next post, which will detail  the ways I am organizing and displaying all this data once I collect it.

Setting up the Google Form

What follows is what I did to meet my needs. You can set it up however you wish to meet your own needs.

Go to Google Forms (or just Google it) and choose a new document. Click on the first "Untitled Question," rename it Date. In the pull-down menu on the right, choose Date.


Click the + on the side to add another variable, and rename it. This spot is going to be for my classes, so I will name it "Class" and I am going to use a Dropdown menu and add each of my classes.


For the description of my lesson (again, click the + and rename the question), I might need lots of room, so I will choose Paragraph.


For my handouts (or this year, with 1:1 Chromebooks, send-outs), I will just choose the Short Answer.


For the last piece, a reminder whether I posted anything to Google Classroom, I just used a Multiple Choice question with two options - Yes or No.

 I have taken this form and put a link to it on my Bookmarks Bar in Chrome.
Next post: Now that we are collecting this data. what do we do with it?

UPDATE: I ended up adding two more categories - one for Homework and a follow-up to Post to Google Classroom - If so, then what?

UPDATE #2: I realized that I really didn't need all of this information as the semester wore on. To streamline the process I eliminated the Homework entry and the Handouts entry, as it was duplicated by the What did I post to Google Classroom entry.