Showing posts with label ed tech. Show all posts

Tuesday, August 21, 2018

Archive your old classes!

Did you know that until you archive your old classes they still show up on the students' Google Classroom?

Time to clean up!

Go to you main Google Classroom page.

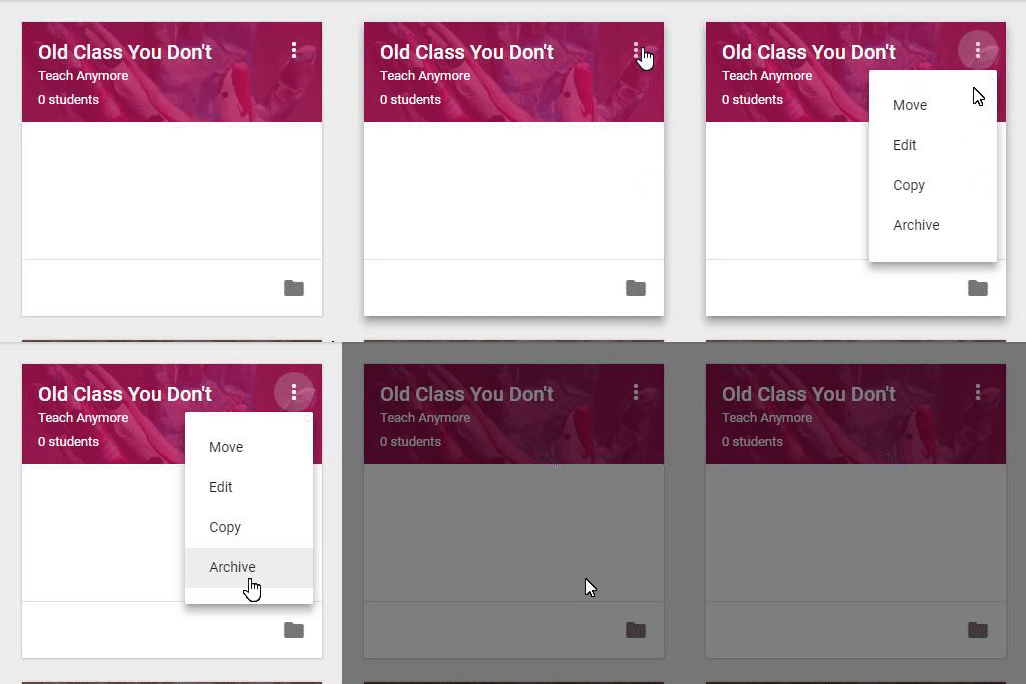
In the upper right corner of each class are 3 dots.

Click the 3 dots.


Image from Gyazo

Choose Archive. Then confirm that you really want to archive the class.


All done!

But wait!

What if you want to get the class back? What if you forgot there was something there that you wanted to re-use for this year? Is all hope lost? Is it gone forever?

Never fear!

On you main Google Classroom page, click on the 3 lines in the upper left corner (affectionately known as "the sandwich") and scroll down to the bottom. 

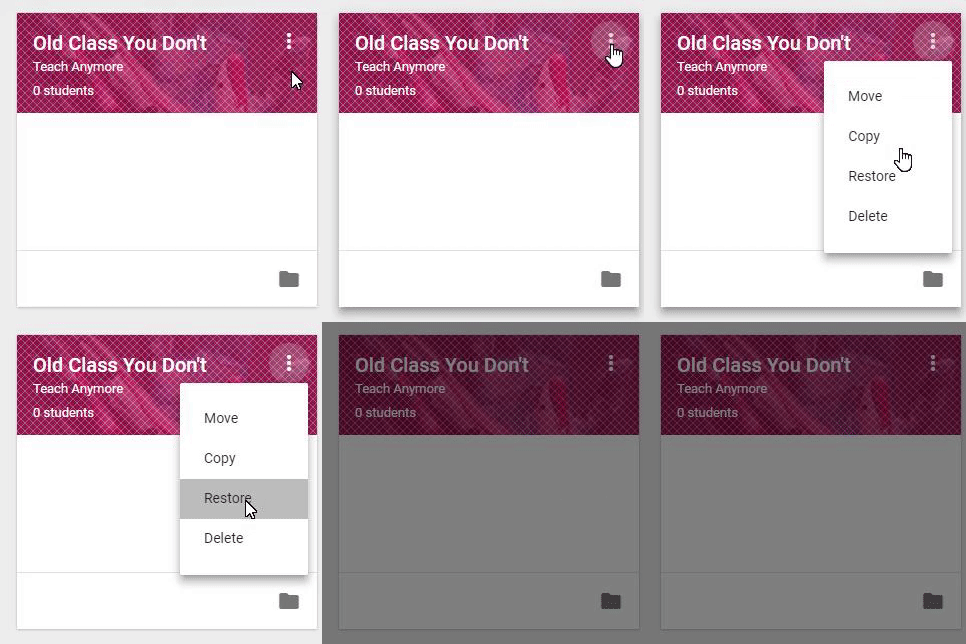
Click on Archived Classes. All of your archived classes from days of yore will appear, kind of cross-hatched and fuzzy, like ghosts from the past through a screen door.

Choose the class you need to resurrect, click on the 3 dots and choose restore.

Image from Gyazo

But remember! When YOU restore the class, it will reappear in any of your old students' Google Classrooms as well. {EDIT: So go to People, click the top checkbox at the top of the Students list. This will choose all of the students. The Actions drop-down menu will become active. Click on the arrow and choose Remove. ]


Tuesday, August 23, 2016

Doc Hub - One Minor Plus over Kami


Although I enthused recently over Kami, the Chrome app Doc Hub has some features to recommend it. The free version is fine for having students fill in pdfs.
You still need to direct it to save in Google Drive; it will not do so automatically. It also saves its own copy of the edited document, so if a student forgets to save it to Google Drive, it is not irretrievably lost.
The one feature it has that I really like is a silly one, but it makes my life easier.
You can insert all sorts of symbols on the document, like check marks and exes.

You can change the size of the symbol and its fill color.


True, you could use the Draw feature on Kami (and as I use a pen stylus instead of a mouse, I can actually drawing something that looks pretty decent - wouldn't want to try that with a mouse). But I like being able to insert those symbols directly on to the students' filled out pdf "papers."

Monday, August 1, 2016

Some helpful hints on using Chromebooks

Many people used to using a computer mouse are stymied at first when using the trackpad on the Chromebooks.

The secret to Chromebooks is


You do not need to make the trackpad go "click" when you hit it. Try practicing the gentlest touch you can muster until you can close a tab, for example. You'd be surprised. 

Here are a few (gentle) finger motions to practice on the trackpad.:
Two-finger tap = right click
(using the tips of your index and middle finger together at one time. Gently.)
Two-finger swipe (vertical) = scroll (it's just a gentle rub, a light tickle, up or down the pad with two finger-tips)
I will admit - I have more trouble pulling off the three-finger motions.
Three-finger tap = open link in new tab
(or you can two-finger tap and tap (gently) "open in new tab"
Three-finger swipe (horizontal)  = switch tabs

Thursday, July 28, 2016

Kami - Fill out pdfs online

Several teachers have asked me about making the switch to Google Docs. They are concerned about converting their documents from Word or other text editors (especially some of the Judaics teachers who cling tenaciously to Davka Writer).
 They are also concerned with the problem of formatting - when you start typing on a Google doc, it pushes the blank space between questions forward.

Kami is a Chrome app and extension that opens in your browser and allows you (or the students) to write in blank space in a pdf. (And remember, you can use Share to Classroom to shoot Kami out to your students on the first day of class!)

So if you have a worksheet that in the past was printed out and filled in by hand in class, you can convert them to pdfs (just 'Save As... pdf' in most word processors) and then you can upload them to Google Classroom as Assignments (not Announcements) and have the students fill them out on the Chromebooks. Imagine - no more reading difficult handwriting! Reminder: Make sure to choose 'Make a copy for each student' before assigning.


Installing Kami

Just have the students install the Kami app as well as the extension (which allows for offline work) and when they open the assigned document in Chrome, they should select Open ... Kami.


The first time you (or your students) open a document in Kami, it will ask for access to your Google Drive. 


IT IS CRUCIAL THAT YOU ALLOW THIS ACCESS! Otherwise it will not work with Google Classroom properly, and work will get messed up or lost. (I know, I have a few "tinfoil hat" kids who are paranoid about granting access online, but trust Google and Kami. I've met the designer. He's cool.)

Using Kami

Most features of Kami work without paying for the Pro account. (There's one important exception, as we shall see.) Click on the T to add text anywhere within the blank space.  Kami gives a pretty bright choice of colors for text, but you can click the Settings gear and choose a more subdued, darker, legible color for text.

Begin typing

You just click on the Text button (the T in the circle) and then you can then begin typing normally in whichever language you choose. 

(English has spell-check; Hebrew does not.) And you can go back to your answer later and edit it, which is a feature missing from similar programs.

Saving and Google Classroom

Assuming you have signed in to Kami, the program will automatically save your work as you type.  However, it will not automatically save back to Google Drive unless you are running the Pro version. (Currently $99/teacher/year.)

  This is very important, because if you are assigning the document through Google Classroom the work needs to be saved there as well.

When you click the Sync button on the top right, you can MANUALLY save the file in Google Drive as well. (I say 'as well' because Kami will also keep a copy of it. Which is all the good, because things sometimes get lost.)


However, for this to work properly, the student will have to re-direct Kami to save the document in its Google Classroom folder. (They could move it after they're done and before they're ready to submit their assignment, but I think in the long run it's easier to train them to do it from the start every time.) 

In each student's Google Drive, there is a folder called "Classroom." Within that folder are folders for each of their classes. Within those folders are the files (Google Docs, pdfs, etc.) for each GC Assignment.

The student must first click >→ Move, and then maneuver to the appropriate folder.

 This only needs to be done once per document. But it is crucial for submitting the finished work to the teacher in Google Classroom. If they do not, they will end up returning the original blank document instead of the copy with all their answers in it.

When the student is finished working in the pdf document, they should save it one more time, and then they can head back to Google Classroom. The document in their folder is now the filled-in pdf. Like any other Google Classroom assignment, when they're ready, they can just click TURN IN.


That's it. The teacher gets the completed pdf the same way s/he gets any document through Google Classroom.  And if the teacher uses Kami, s/he can grade and comment on the pdf as well. Postscript: Just in case you were worried, once the pdf is submitted to the teacher, Kami will not allow it to be edited directly by the student.
Add a custom character in Chrome

One of the strange things about the world of Chromebooks is that certain shortcuts don't work anymore, or work the way they used to. 
For example, if you're on a PC in Word, and you type alt+10003, you'll insert a check mark. √

If you're in Chrome and on a PC, you can do that by typing alt+251. See? √.

But if you're on a Chromebook, gornisht helfen as my people say. (Nothing helps.)

If you're in Google Docs, you can go to Insert > Special Characters > and then search for Check Mark. Click it and it will insert a check mark into your doc. If you need one elsewhere (like if you're correcting a pdf in Google Classroom on Kami), you can do that in Google Docs first and copy and paste it. Every. Single. Time. You. Need. One.

OR
You can add the Special Characters extension to Chrome. Highlight and copy a check mark (Here - take mine √ ).
Right click the extension in the upper-right hand corner  

and choose Options. 


Click Add Character, paste the check into the empty box. Name it and save it. (And, while you're at it, you can delete the standard characters in the English set if you don't need them.)

Now, whenever you need a check mark (or whatever it is you need to insert not infrequently into text - a winky face or a skull and crossbones) click on the extension and select the mark, and it will now be copied to your clipboard, ready for you to hit ctrl+v, which, happily, still works on Chromebooks. 
(Or right-click, Paste, if you can't give up your mouse.) 
Et voila - √  😉 or ☠ or whatever.


Why'd they take the Delete key away on Chromebooks? And other useful shortcuts

True, they took away the Delete key (and the Home/End keys, and the PrtScr key, et cetera) but all these functions are still available on the Chromebook with the built-in keyboard shortcuts.


First, on your Chromebook type Ctrl + Shift +? (meaning hold down the ctrl and shift keys and then hit the question mark key.) You will get an interactive keyboard map. Proceed to hit each modifier key, one by one (ctrl, shift, alt) and then in combinations. The map will show you what each key or combo does with the various keyboard keys.

Besides your old favorites like ctrl + c (Copy) and ctrl+v (Paste) there are dozens more.

ctrl+shift+up/down arrow will emulate the Home and End keys.

alt+backspace = delete


ctrl + switch window  (that's the show all windows .key) = Print Screen

Here's a list of the shortcuts, for easy reference.

Here's an even longer one, including a lot of foreign language accents. 

Explore and discover the possibilities!


Wednesday, July 27, 2016

Create a Sitemap of a Talmud page (or Chumash, or a Frog) Using Thinglink

Building a Clickable Sitemap of an Image

You can do what I am about to demonstrate with a picture of anything, like the Periodic Table, a political cartoon, or the internal organs of a frog, but since some on the Jewish Studies staff seem to be at a loss for using tech in the classroom, I thought I'd offer some ideas. :-)

Let's obtain a picture of a page of Talmud (or a page from a Mikra'ot Gedolot). To make it harder, let's look for a page that we're actually going to be teaching this year.


Quick & Dirty Method of Getting a Picture File

Life is always better if you can avoid unnecessary steps. If you can find a picture file (.jpg, .gif, .png) of what you want, you're hafway home. Skip to the section title Now we have an image file.

There are picture files (jpegs) of every page of Talmud on e-daf.com. Find your page and right-click and select Save image as...  
They aren't the clearest in the world, but they will do the job for this exercise.


Fancy-Shmancy Method for the Best Copy Possible

If you can't find an image file, you may be forced to convert a .pdf. Without doubt, the clearest .pdf copy of a Talmud page can be found at the Daf Yomi Portal. Seriously. Download a page and enlarge it to 300% in Adobe Reader and compare for yourself.

(To download, put the cursor over the picture of the daf and then click on צורת הדף.) 

This method I am describing will also work for any pdf you want to use, like grabbing a page of Chumash from Hebrewbooks.org

Once you have your .pdf, you can convert it to an image file.

The best conversion of .pdf to .jpg I've found is online at this multi-faceted site. (I've blogged in praise of it previously.) Upload your .pdf and turn it into a .jpg.


Now we have an image file

Go to Thinglink, register or sign in, and upload your picture.

Here is a quick tutorial (not mine) on using Thinglink.

I decided to mix it up and linked to web pages (do your students know that Ein Mishpat and Masoret HaShas were written by the same guy? They will after they finish their research!), pictures, videos, a gematria calculator (for the daf number) and an old encyclopedia page. You can also encourage (or demand) that your students create their own sources to link to.

Here is what I came up with.