How to put Make a Footer in Word, and How to Make it only appear on One Page
Frequently when I make quizzes or worksheets I print them as two-sided documents because I’m trying to cut down on our paper consumption.
However, some of my students require visual reminders that there is more work on the second side. So I put OVER→ down at the bottom of the page, in the Footer. (A Footer is defined as “One or more lines of text that appear at the bottom of every page of a document. Once you specify what text should appear in the footer, the application automatically inserts it.” Dynamic footers include automatic page numbering, or the current date which changes each time you print the document; static footers include the name of the school or teacher, etc.)
If you know how to make a footer in Word, you can skip down to How to make a footer appear on one page only.
To make a footer,
| Click on Insert in the Ribbon |
 |
And then click over on Footer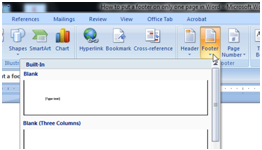 |
| And type in your footer. A quicker way is just to double-click on the area at the bottom of your document, which will bring up the Footer menu. (The same is true for the top of the page and the Header menu.) In my case I made the footer right-justified, typed OVER, and on the Insert menu, went over to "Insert Symbol." I found the arrow symbol and clicked Insert. How to make a footer appear on one page only My problem was, now I have OVER→ on the bottom of both sides of the paper, making it into one of those “How to keep a moron busy (See other side)” jokes. |
| The solution? Click on Page layout on the Ribbon |
And then the little arrow in the bottom right corner of Page Setup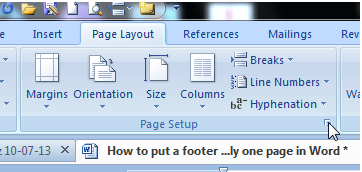 |
Which will bring up this dialogue box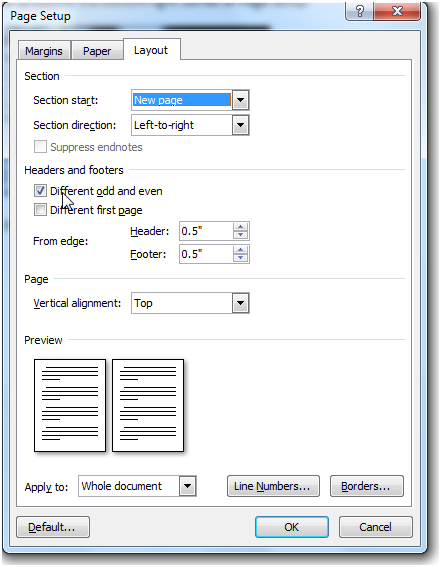 |
| Click Different Odd and Even and the OVER→ will vanish from Page 2! To make a packet with a cover start with Page 1 on the second page:
|
No comments:
Post a Comment