Tuesday, August 28, 2018

Rediker TeacherPlus for Phones!!!!

It's here! Rediker has a TeacherPlus app for phones!!!!

Cover art

iTunes preview for iPhones (You can only get the app directly in the App Store on your iPhone)

Google Play link for Androids

Yay!

When you install it, it asks to "Add School." Just type in your Rediker login, which should be your school e-mail, and your Rediker password.

First Day of School - Quick Access to Google Folders

As I have been transitioning from Dropbox to Google Drive to store my digital life, I've accumulated a lot of folders.

Besides my Google Classroom folders I have folders for each of my classes.*
So I don't have to scroll constantly to find each class, each year I rename my class folders by adding numbers at the beginning of the file name. I also give them distinctive colors to help distinguish between two sections of the same class.

Just open Google Drive, find your class-materials folder and right-click .


Click Rename and add a number. I start with 01 and go up from there.


Click OK and you're all set.

While you're there, why don't you give them each a different color.

Right click the folder name again and click Change color.


This is what it looks like.


Isn't that nicer? 😃


*NB - (I am NOT talking about the specific class folders within your [Google] Classroom folder - don't mess with that. GC won't know where to send files.)

I'm just talking about a folder where I store pdfs, documents, readings, SMARTBoard files, etc.

Tuesday, August 21, 2018

Archive your old classes!

Did you know that until you archive your old classes they still show up on the students' Google Classroom?

Time to clean up!

Go to you main Google Classroom page.

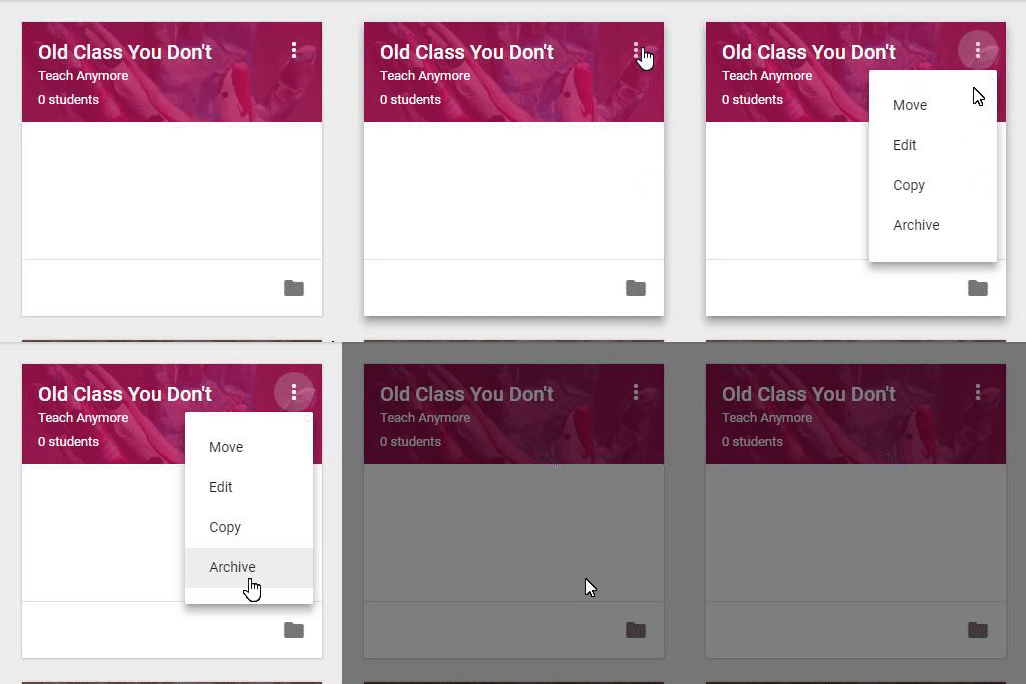
In the upper right corner of each class are 3 dots.

Click the 3 dots.


Image from Gyazo

Choose Archive. Then confirm that you really want to archive the class.


All done!

But wait!

What if you want to get the class back? What if you forgot there was something there that you wanted to re-use for this year? Is all hope lost? Is it gone forever?

Never fear!

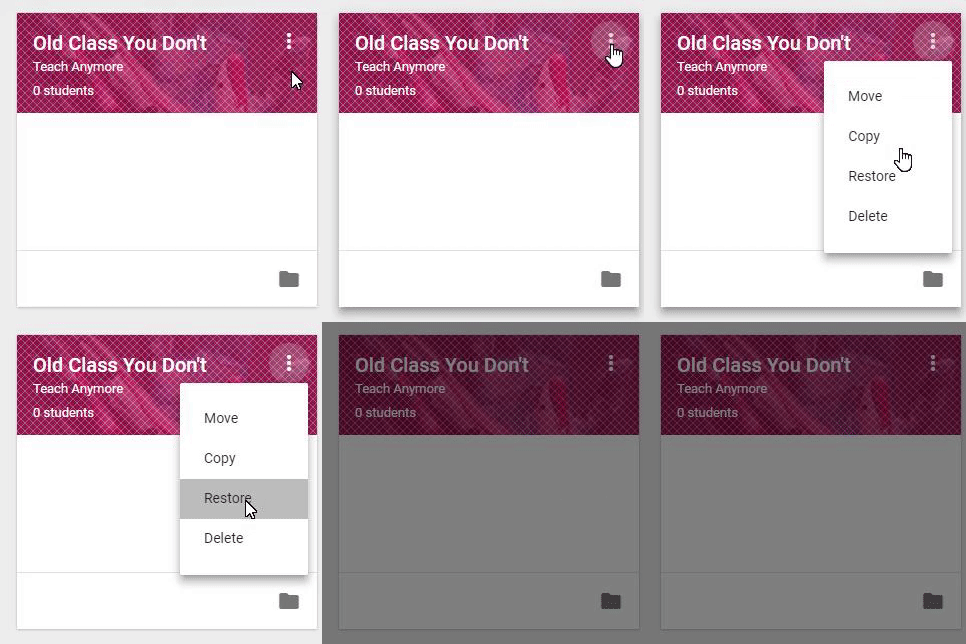
On you main Google Classroom page, click on the 3 lines in the upper left corner (affectionately known as "the sandwich") and scroll down to the bottom. 

Click on Archived Classes. All of your archived classes from days of yore will appear, kind of cross-hatched and fuzzy, like ghosts from the past through a screen door.

Choose the class you need to resurrect, click on the 3 dots and choose restore.

Image from Gyazo

But remember! When YOU restore the class, it will reappear in any of your old students' Google Classrooms as well. {EDIT: So go to People, click the top checkbox at the top of the Students list. This will choose all of the students. The Actions drop-down menu will become active. Click on the arrow and choose Remove. ]


Sunday, July 8, 2018

Text to table: Making a vocabulary chart from text in Google Docs or Microsoft Word

SPOILER ALERT: This is slightly easier in Word.

Let's say you want to create a vocabulary chart in Chumash for students to fill in the שורש, as well as prefix(es) / suffix(es) and translation. (This works in any language; I'm using Hebrew because it's what I teach.)

PART ONE: GOOGLE DOCS

If you stay in Google Docs, the only way to do it is create a table, and drag each word into one of the cells. Which is doable, but it's a slog.

However, by using Google Sheets, we can in effect convert text to a table.
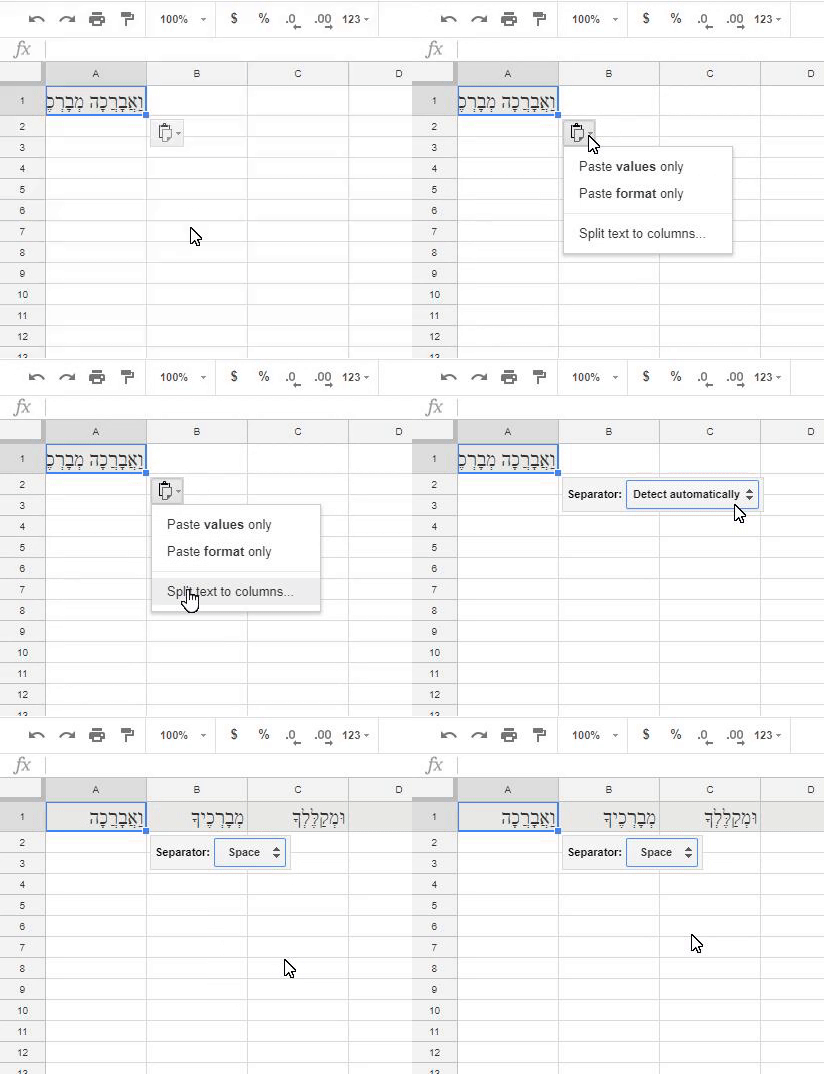
Begin by copying the פסוק from any online site with text (like Sefaria) and paste it into the first cell of a Google Sheet.

Image from Gyazo

However, this leaves all the words crunched up in one cell. Not useful.

Click the little "clipboard" icon that pops up next to the cell (or if you miss it, go to Data | Split Text to Columns), and choose Separator: Space. This will put each word in the verse in a separate cell in the same row. Still not what we want, but one step closer.

Image from Gyazo


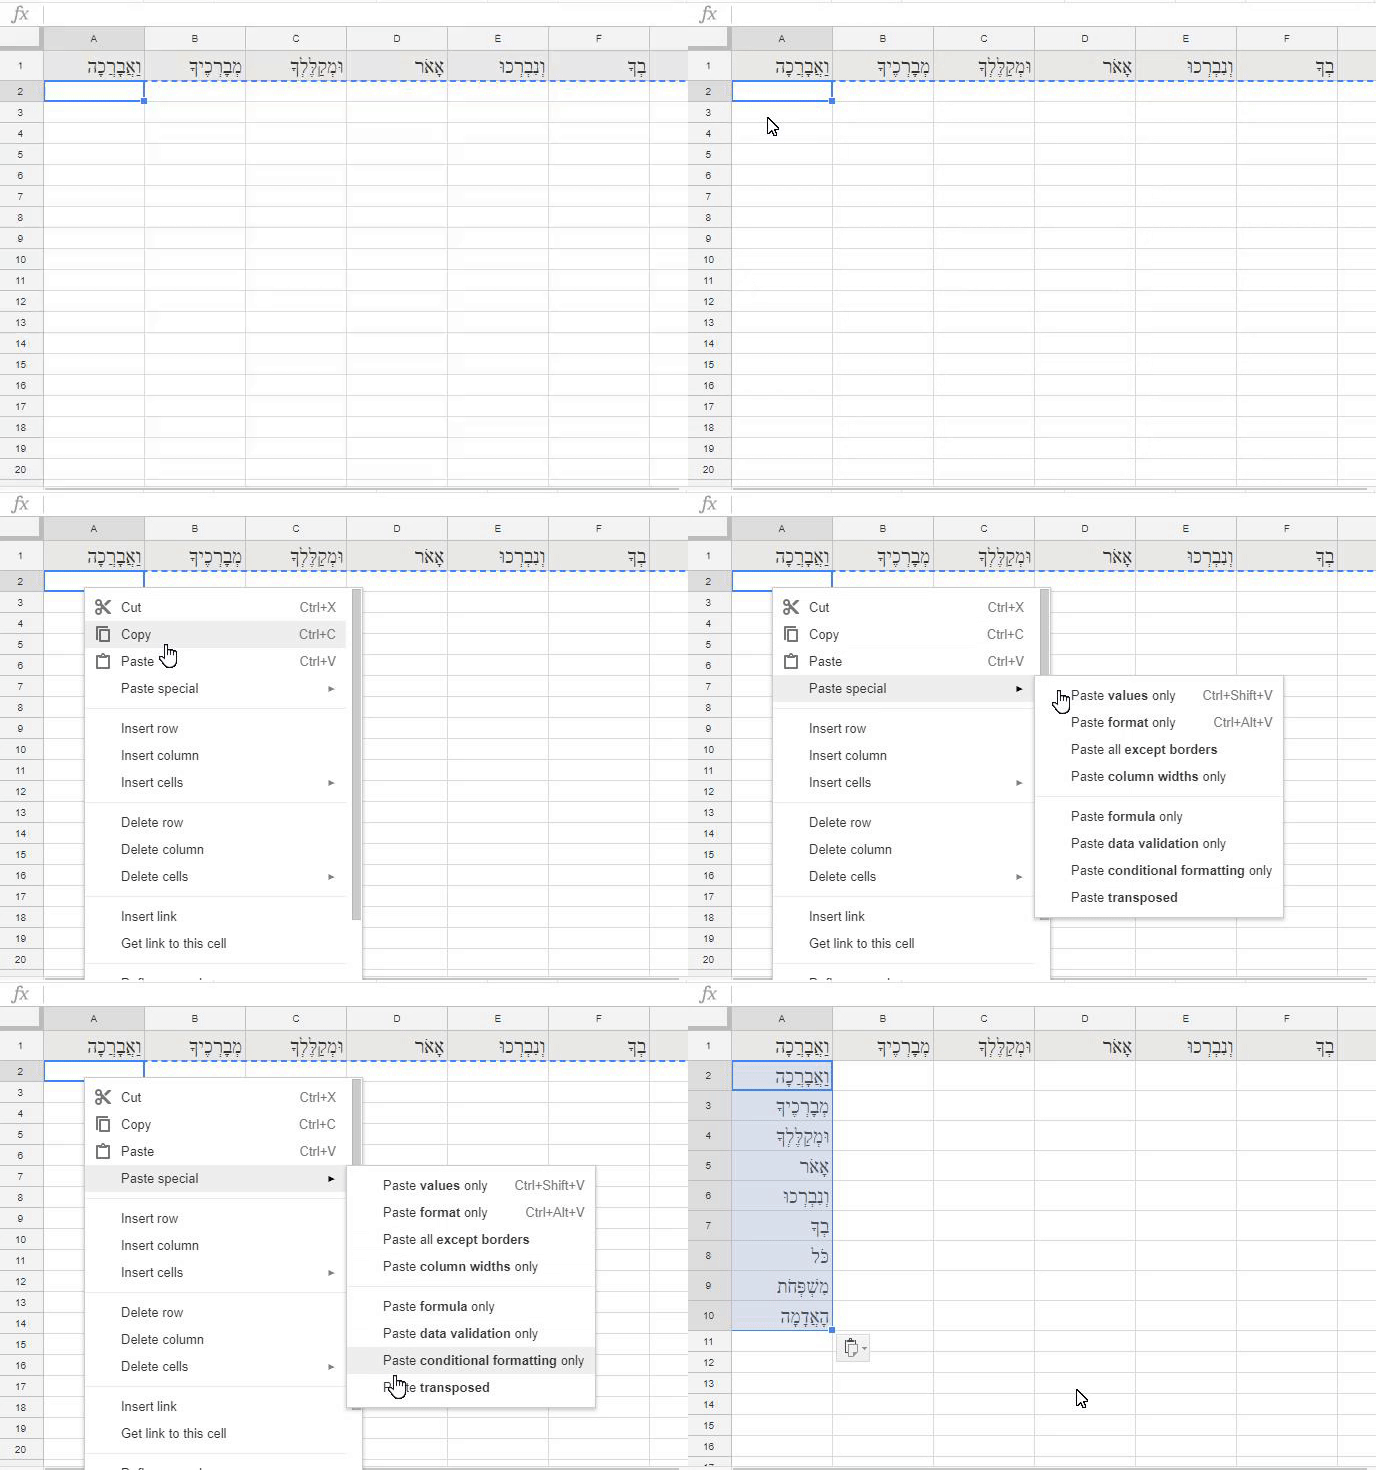
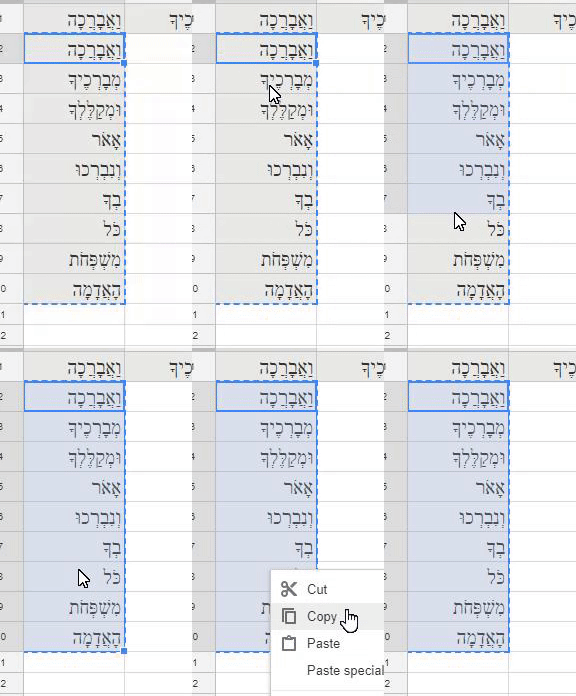
Highlight all the words in the row and copy (either Ctrl+C or Edit | Copy)

Image from Gyazo


Now RIGHT-click in the first cell of the 2nd row (2A) and select Paste Special | Paste transposed. This will now paste all of the words in the first column, which is what we need.


Image from Gyazo


Now just highlight and copy the column (ignoring the first row).


Image from Gyazo

Now you can go to Google Docs and paste this table into a new doc. You can choose Paste unlinked.


Right click and add as many columns (to the left, if you're doing Hebrew) as you need.


PART TWO: MICROSOFT WORD

As promised, word makes it slightly easier.

Paste your verse / sentence etc. into Word

Highlight it, and go to Insert and click on the arrow at the bottom of the Table icon, and choose Convert Text to Table.


The default will be the number of words as columns. You want to reverse that, and change the number in the Columns box to 1; the number of rows will change automatically to the number of words.


Where is says Separate text at: choose Other and hit the SPACE BAR once. Then hit OK.
This will place all your words in a single column, one word per cell. From here you can add columns, delete rows for words you don't want to feature, etc.


Saturday, June 16, 2018

Mute tab in Chrome

Want to stop music or sound from a side-panel video from playing on Chrome?

Type (and by type, I mean copy and paste) the following in your address bar:

chrome://flags/#enable-tab-audio-muting
and then hit Enter.

Choose to enable the feature.


Now when something starts playing just click the little speaker icon in the tab, and it will mute whatever is playing on that webpage.


Tuesday, May 29, 2018

CheckMark Extension adds years to your life

[UPDATE: The new Comment Bank feature in Classroom makes this extension obsolete.]

Well, maybe not years, but I probably just saved over an hour of typing the same comments on 40 tests. It adds up.

CheckMark is an extension that lets you add customized comments (or canned comments if you teach English Composition on the grade level it's aimed at) on Google Docs at the click of a button. They can be as long as you need, and can include multiple languages, symbols or anything else you can put in a Google Docs comment (i.e. no special formatting).

Go the Chrome Store and get CheckMark


When you install it, it will appear in your Chrome Menu in the upper-right hand corner.


If the first time you click it it does not say Enabled, enable the extension.

At first it will present you with a list of canned comments for English Comp. If they work for you, enjoy. If they do not, you can delete every single one by clicking the red X.

Here's where it gets useful. Let's say you start grading and soon realize that several students have made the same mistake. Do you want to type "I think you confused Jefferson Davis and Thomas Jefferson" on 40 Google Docs? I didn't think so.

So let's go:

Click on the Extension, and then on the Preview Edit Pencil.

Click on the green + sign. Give your comment a 3-4 letter abbreviation so that you can readily identify it, and type (or paste) the comment you're going to be re-using. Click Apply.


I, by the way, ended up with about 11 "stock" comments for this particular test.

Back in Google Docs, when you come to one of those answers...

 Highlight a word in the answer, and the CheckMark bar will appear translucently above the line.

If you hover your cursor over the little blue box it will get darker and he comment will appear in a hover text box, just to be sure you're choosing the correct response.
 Click the blue box and CheckMark will automatically enter the pre-selected comment into Google Docs comments and close the comment box.


Downsides: If you're moving among different assignments, and you don't need CheckMark for one class, (mine were VERY test-specific) the only way to silence it is to [click the 3 square dots at the top-right of your Chrome browser] go into More tools, Extensions, and temporarily disable the extension.
Also, I have had limited success with it fully syncing between computer, and have gone home and not found all of my added comments available.
But I suspect these will get ironed out in future iterations.

I still think it is a fantastic addition to my Google Docs tool case.


Some nice Hebrew fonts for Google Docs

It's always nice to play with typography to make our Google Docs stand out.

The Extensis add-on to Google Docs can give you access to hundreds of new fonts.

(In any Google Doc, go to Add-ons, click "Get Add-ons", and search for Extensis. Select it, choose your account and click Allow.)

So how many of those fancy fonts work for Hebrew? About 15 - 20. (and no Rashi yet)

Check them out here. The page will show you what they look like.
(Here is a partial screenshot)


Or just search in Extensis for the following fonts:
Alef, Amatic SC, Arimo, Assistant, Bellefair, Cousine, David Libre, Frank Ruhl Libre, Heebo, Miriam Libre, Rubik, Secular One, Suez One, Tinos, Varela Round

[Cousine has weird spacing issues with the letter ו"ו, and Secular One and Suez One are bold poster-like fonts.]

To the above list I will also mention Cardo and Tahoma, which can be found in Extensis as well.

If you know of any more, please let me know in the comments.