Wednesday, September 5, 2018

Sir Links-a-Lot Chrome extension

Here's a handy extension that can change your Google Doc's sharing setting from "Anyone with a link can edit / view" to forcing anyone with the link to make a copy.

Why would you want to do that?

I use it all the time to send out a Google Doc when I want every student to have his/her own copy to edit, highlight, take notes on, etc. but not as a class.

It can be found in the Chrome store here.

When installed, it looks like this when you click it while you have a Google Doc open.


Click Force copy and it with change the "edit" in the link to "copy.

Then share this new link with your class.

There are other functions available; I have found this one to be the most useful.

You can also do this manually, without the extension. Directions here.

Tuesday, September 4, 2018

The fastest way to collect data - Google Classroom Questions

I finally got my textbooks! 😊
I had to distribute them to my classes, but I did not have a class roster on which to write down all the book numbers.🙁

Solution: Google Classroom | Classwork | + Create button | Question:


Question: What are the last 4 digits of your bookplate number?

Points: Ungraded

Due Date: No due date

Topic: Question

And voila. Instant data collection. I just copied the Turned in work and pasted it into Notepad, which strips out the formatting and saved the list.


Tuesday, August 28, 2018

Rediker TeacherPlus for Phones!!!!

It's here! Rediker has a TeacherPlus app for phones!!!!

Cover art

iTunes preview for iPhones (You can only get the app directly in the App Store on your iPhone)

Google Play link for Androids

Yay!

When you install it, it asks to "Add School." Just type in your Rediker login, which should be your school e-mail, and your Rediker password.

First Day of School - Quick Access to Google Folders

As I have been transitioning from Dropbox to Google Drive to store my digital life, I've accumulated a lot of folders.

Besides my Google Classroom folders I have folders for each of my classes.*
So I don't have to scroll constantly to find each class, each year I rename my class folders by adding numbers at the beginning of the file name. I also give them distinctive colors to help distinguish between two sections of the same class.

Just open Google Drive, find your class-materials folder and right-click .


Click Rename and add a number. I start with 01 and go up from there.


Click OK and you're all set.

While you're there, why don't you give them each a different color.

Right click the folder name again and click Change color.


This is what it looks like.


Isn't that nicer? 😃


*NB - (I am NOT talking about the specific class folders within your [Google] Classroom folder - don't mess with that. GC won't know where to send files.)

I'm just talking about a folder where I store pdfs, documents, readings, SMARTBoard files, etc.

Tuesday, August 21, 2018

Archive your old classes!

Did you know that until you archive your old classes they still show up on the students' Google Classroom?

Time to clean up!

Go to you main Google Classroom page.

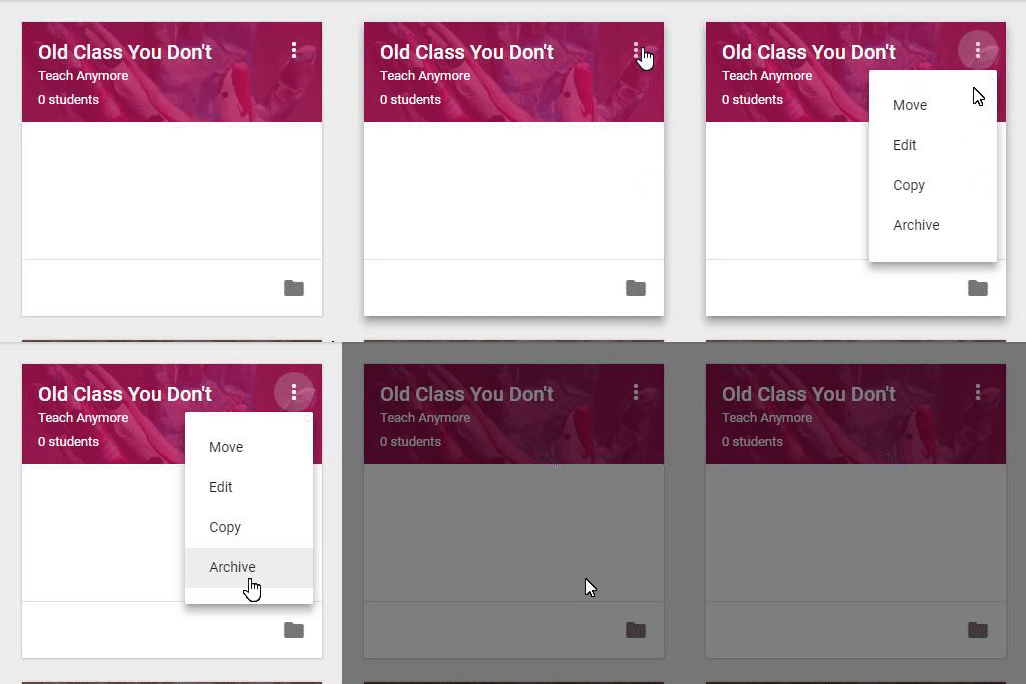
In the upper right corner of each class are 3 dots.

Click the 3 dots.


Image from Gyazo

Choose Archive. Then confirm that you really want to archive the class.


All done!

But wait!

What if you want to get the class back? What if you forgot there was something there that you wanted to re-use for this year? Is all hope lost? Is it gone forever?

Never fear!

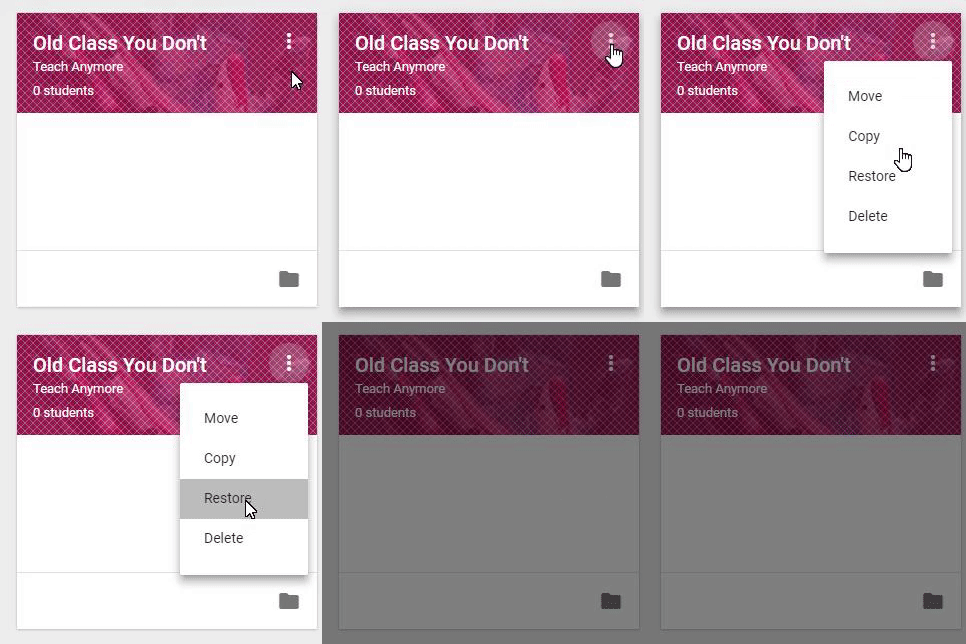
On you main Google Classroom page, click on the 3 lines in the upper left corner (affectionately known as "the sandwich") and scroll down to the bottom. 

Click on Archived Classes. All of your archived classes from days of yore will appear, kind of cross-hatched and fuzzy, like ghosts from the past through a screen door.

Choose the class you need to resurrect, click on the 3 dots and choose restore.

Image from Gyazo

But remember! When YOU restore the class, it will reappear in any of your old students' Google Classrooms as well. {EDIT: So go to People, click the top checkbox at the top of the Students list. This will choose all of the students. The Actions drop-down menu will become active. Click on the arrow and choose Remove. ]


Sunday, July 8, 2018

Text to table: Making a vocabulary chart from text in Google Docs or Microsoft Word

SPOILER ALERT: This is slightly easier in Word.

Let's say you want to create a vocabulary chart in Chumash for students to fill in the שורש, as well as prefix(es) / suffix(es) and translation. (This works in any language; I'm using Hebrew because it's what I teach.)

PART ONE: GOOGLE DOCS

If you stay in Google Docs, the only way to do it is create a table, and drag each word into one of the cells. Which is doable, but it's a slog.

However, by using Google Sheets, we can in effect convert text to a table.
Begin by copying the פסוק from any online site with text (like Sefaria) and paste it into the first cell of a Google Sheet.

Image from Gyazo

However, this leaves all the words crunched up in one cell. Not useful.

Click the little "clipboard" icon that pops up next to the cell (or if you miss it, go to Data | Split Text to Columns), and choose Separator: Space. This will put each word in the verse in a separate cell in the same row. Still not what we want, but one step closer.
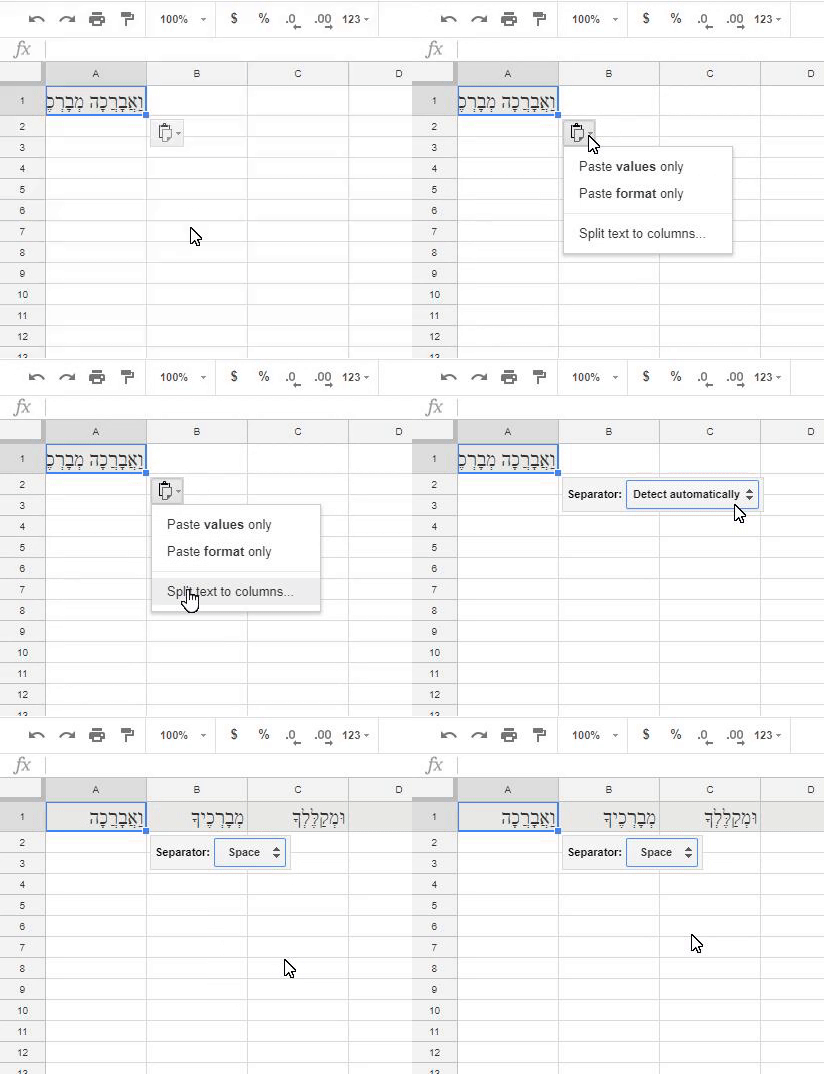
Image from Gyazo


Highlight all the words in the row and copy (either Ctrl+C or Edit | Copy)

Image from Gyazo


Now RIGHT-click in the first cell of the 2nd row (2A) and select Paste Special | Paste transposed. This will now paste all of the words in the first column, which is what we need.
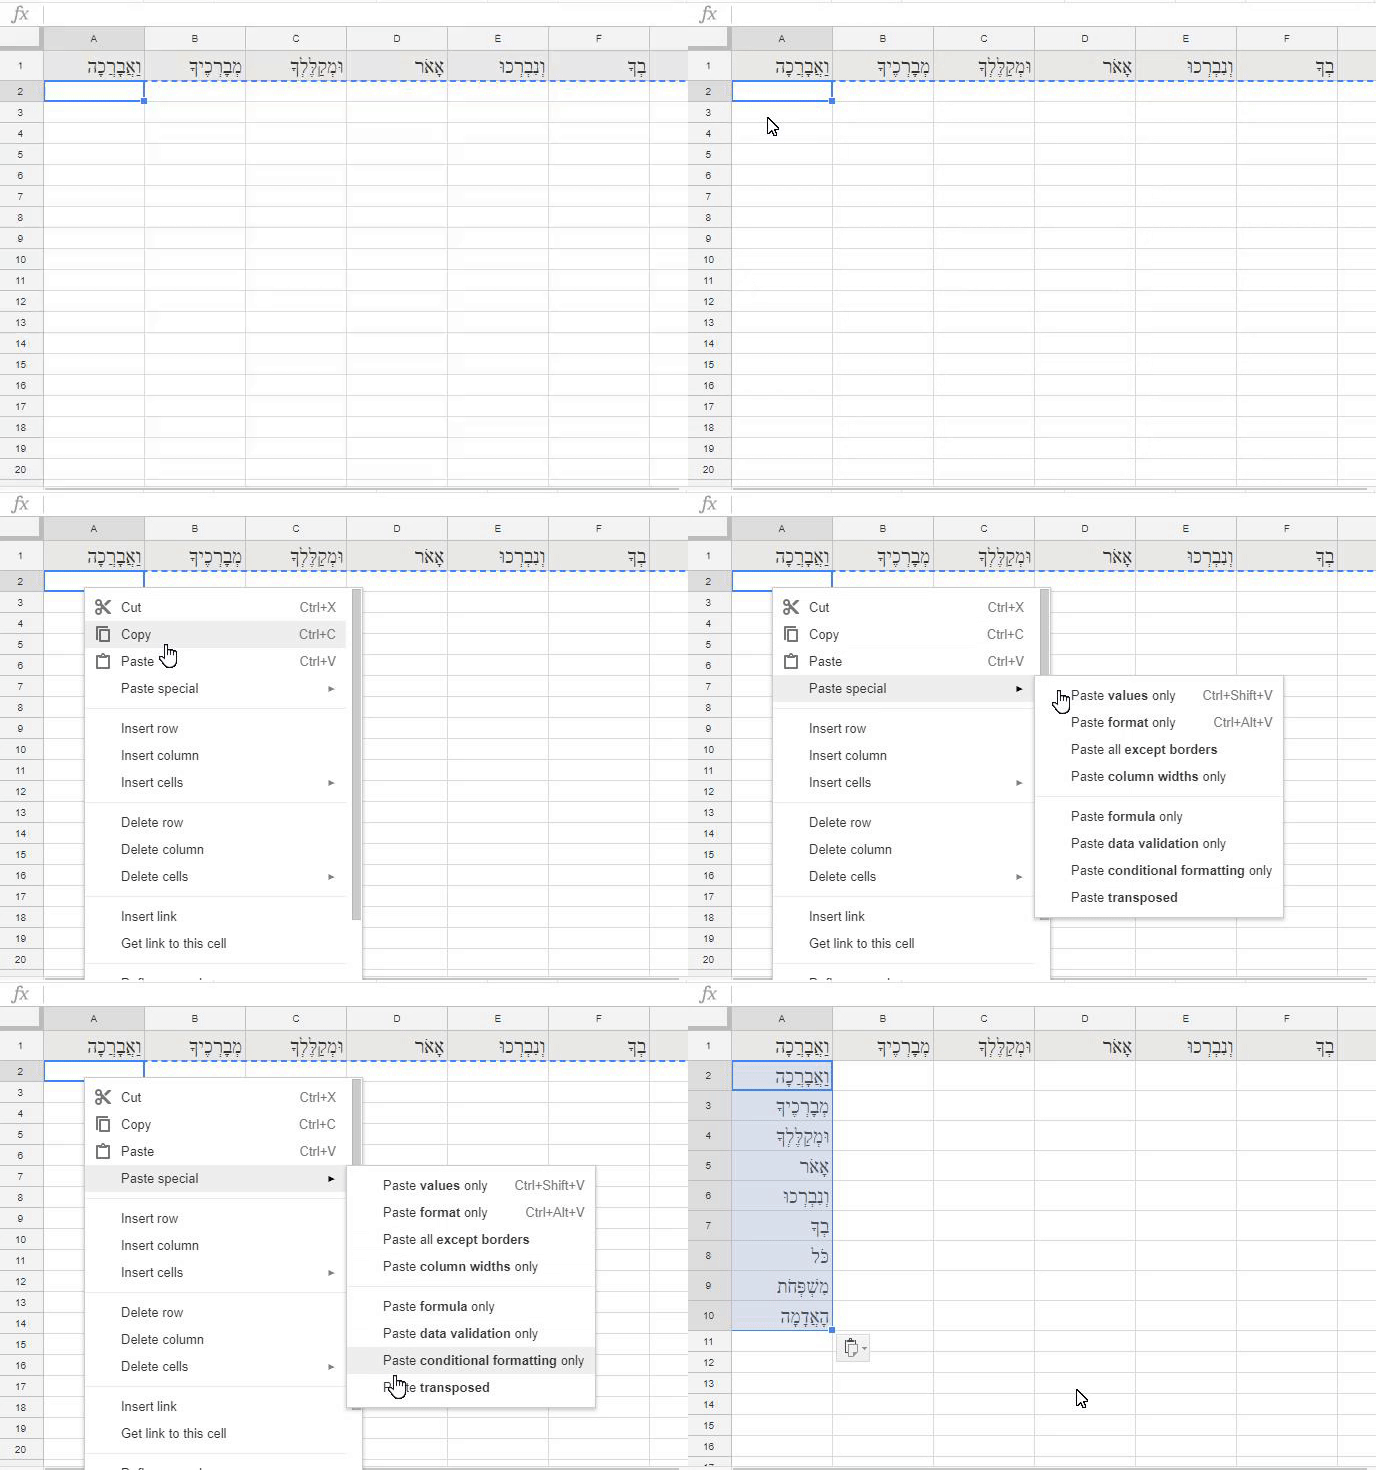

Image from Gyazo


Now just highlight and copy the column (ignoring the first row).
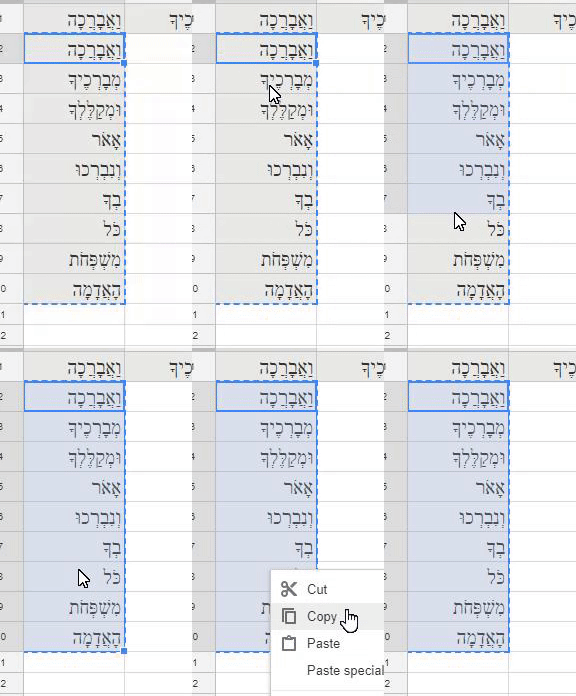

Image from Gyazo

Now you can go to Google Docs and paste this table into a new doc. You can choose Paste unlinked.


Right click and add as many columns (to the left, if you're doing Hebrew) as you need.


PART TWO: MICROSOFT WORD

As promised, word makes it slightly easier.

Paste your verse / sentence etc. into Word

Highlight it, and go to Insert and click on the arrow at the bottom of the Table icon, and choose Convert Text to Table.


The default will be the number of words as columns. You want to reverse that, and change the number in the Columns box to 1; the number of rows will change automatically to the number of words.


Where is says Separate text at: choose Other and hit the SPACE BAR once. Then hit OK.
This will place all your words in a single column, one word per cell. From here you can add columns, delete rows for words you don't want to feature, etc.



Saturday, June 16, 2018

Mute tab in Chrome

Want to stop music or sound from a side-panel video from playing on Chrome?

Type (and by type, I mean copy and paste) the following in your address bar:

chrome://flags/#enable-tab-audio-muting
and then hit Enter.

Choose to enable the feature.


Now when something starts playing just click the little speaker icon in the tab, and it will mute whatever is playing on that webpage.