Wednesday, July 31, 2019

Uploading files from computer to Google Drive

A quick tutorial on how to upload files from a computer to your Google Drive.

Open Chrome and go to Google Drive (drive.google.com). Make sure you are signed in to your Google account. (Reminder - your school Google Drives are virtually (ha!) bottomless, so you'll probably never run out of room.)

Click on the "New" button in the upper left.


The click on either "File Upload" (if you just wish to upload a file, or a few select files) or "Folder Upload" (if you want to upload an entire folder, or several folders).


Then a Windows Explorer window (the thing that looks like a manila file folder) will open. Navigate to the folder(s) you want, and then click "Open."


QUICK REMINDER: You can choose multiple files by holding the Ctrl key as you click each one with your mouse. If you want to choose a group of files, you can hold the Shift key, click the first file, and while still holding the Shift key, click the last file in the group; all the files in between will now be highlighted / chosen.

Tuesday, March 12, 2019

Coolsymbol.com - fun stuff (and a very useful tool for Hebrew)

Check out coolsymbol.com. It is full of fun symbols to dress up your docs, neat text effects and all other sorts of goodies.

Just look at all the different star symbols to use in place of a boring asterisk:


Just click on anything and it loads into your clipboard.

It has so much more than the Insert Special Character in Google Docs. 

But if you scroll all the way down to the bottom of the home page, there's something very useful for Google Doc workers in Hebrew or Arabic or any other Right to Left language: Other Special Non-Printing Characters. [UPDATE: This can be done manually on Chromebooks. See below.]


The one we want is the very last one - Right-To-Left Mark.

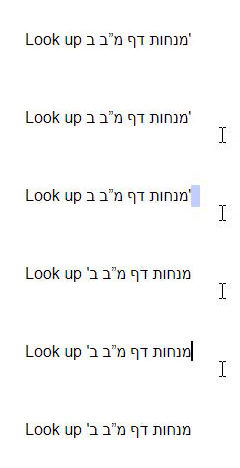
If you've ever put a punctuation mark after a Hebrew word in Google docs (like a single quote, a/k/a גרש, a/k/a tchuptchik) you know the frustration of having it go to the other end of the sentence.
Click the Click to Copy box and after you type the גרש, hit ctrl+v and the mark will magically jump back to where it belongs.

Image from Gyazo

(This is one of the many reasons I still write my multilingual English/Hebrew documents in Word rather than Google Docs; Word keeps going right to left until you switch back to English.)

UPDATE: Manual method for Chromebooks only.
After you type the גרש and it goes to the wrong side, switch to English and hit Ctrl+Shift+U. You'll see an underlined u. Type 200F and hit enter. This will insert a RLM (Right-to-Left Mark)
I didn't say it was easy, just manual.


Hebrew Formatting from Word to Docs

If you have ever tried to save a multilingual Word Doc mixing right-to-left and left-to-right text as a Google Doc, you know that the formatting can often get messed up in the transition.

(Full confession: I still write most of my tests in Word. It still handles Hebrew better than Docs.)

However, if you paste the Word doc into a blank Google Doc, the proper formatting is preserved.

The one thing that gets changed is - if you use automatic numbering in Word, the numbers will get pasted into Docs as regular text, not automatic updating numbers. Not a deal-breaker for me. The upside outweighs the downside.

Thursday, March 7, 2019

Search within folders in Google Drive

Sometimes something new is right in front of you and you don't pick up on the difference. Once when I was a kid, my father shaved off his mustache and I didn't notice it.

Apparently, for the last year, there's been a new feature in Google Drive; one, in fact, that I always felt was a major missing feature that rendered Google Drive less than user-friendly. You can now (now being either January 2018, or this morning, when I finally noticed it) search within folders on Google Drive.

This is important. Although I keep my Drive fairly neat, with nested folders within folders, often I can't remember in which folder a crucial file is hiding.

Right click on the folder in Google Drive online. One of your options is "search within _____ "


Saturday, October 20, 2018

Line Numbers for Google Docs now works for Right-to-Left docs as well

One of the things that kept me using Microsoft Word is the line number feature. When teaching texts to students, it helps to be able to direct them to the right line easily.

The useful Google Docs extension Line Numbers for Google Docs adds line numbers along the left side of the page. But what if your document is a Right-to-left document, like Hebrew or Arabic?

Thanks to extension designer Pablo Gamito, the extension now easily handles such documents. (I e-mailed him on Friday and he updated the extension the very next day!)

EDIT: Two caveats - the numbers do not appear in a shared document (although there's nothing stopping the recipient from installing and utilizing the extension herself) and they are not retained if you use Download as pdf, although if you use Print to pdf, they are preserved. This has dampened my enthusiasm somewhat.

Install the extension from the Chrome Store. Once in a Google Doc, click the extension and choose how many lines (every one, every five, etc.) you want numbered.


Click on "Show More Options"


There are many ways to customize the numbering, as you can see. Choose the last item to have the numbers appear on the right.

If the numbers don't appear immediately, click Reload Google Docs Page. And voila!


If this is useful, be sure to give the extension a positive rating on the Chrome Store. And if your corporate / school account is like ours and won't let you log in to the Chrome Store even if you can download extensions, log in under your personal account and give the designer the thanks he deserves.


Wednesday, September 5, 2018

Posting documents on Google Classroom that don't need to be submitted

[UPDATE: Google Classroom has fixed this problem with the addition of the Post Material option, so this post is moot.][Does Google ever run their updates by actual teachers?! ]

I have a particular problem with the new Google Classroom - you can't assign a topic to an announcement.

So if I want student to be able to go back and locate a worksheet or a text document to study for a quiz or test, I have to post it as an assignment, so the posts are organized by topic.

But if I am sending out a graphic organizer on Google Docs, I want the students to have their own copy, and I don't want them to have to submit the document back to me - it's there for them to use, and to train them to take notes.

I tried to do it as I did last year, but it didn't work.

Unfortunately, as teachers we cannot see what the student gets when we post something. Luckily I have a fake student account, and recently I went back and forth through 4 different attempts until I got what I needed.

To wit:
1. Send out as an Assignment so that it can be grouped with the other worksheets and easily retrieved later.
2. Force each student to make a copy of the original document so that each student is working on his/her own copy
3. Not require them to return the document to me, but just to click the MARK AS DONE button.

The Process

Step One: Create your document on Google Docs.


Step Two: Change the Sharing settings from Anyone with the link can edit to Force everyone to make a copy.

You can do that manually (see directions here) or you can use the Sir Links-a-Lot Chrome extension (see post here).
Make sure the new link is saved to your clipboard.

Step Three: Open Google Classroom and Create an Assignment.


Name the assignment, change the Points Value to "Ungraded," do not assign a Due Date, and assign a Topic.


Do NOT use the Add Link feature! Paste the force-copy link on the Instructions line, and click ASSIGN.

This is what the student sees:


Student clicks on the link and it opens another window and forces them to make a copy. Student can then just click MARK AS DONE and clear the "assignment."

Sir Links-a-Lot Chrome extension

Here's a handy extension that can change your Google Doc's sharing setting from "Anyone with a link can edit / view" to forcing anyone with the link to make a copy.

Why would you want to do that?

I use it all the time to send out a Google Doc when I want every student to have his/her own copy to edit, highlight, take notes on, etc. but not as a class.

It can be found in the Chrome store here.

When installed, it looks like this when you click it while you have a Google Doc open.


Click Force copy and it with change the "edit" in the link to "copy.

Then share this new link with your class.

There are other functions available; I have found this one to be the most useful.

You can also do this manually, without the extension. Directions here.